Raising and harvesting meat chickens at home is a great way to provide your family with nutritious food. It’s nice to know how the chickens were raised and what they were fed. The downside to raising meat chickens is harvesting them. Here are some tips to make the harvesting process a little bit easier.
The most commonly raised meat chicken is the Cornish cross. These chickens reach harvest weight in as little as 6-8 weeks. Other breeds, like the Rudd Ranger, are bred to be raised on forage and take a little bit longer. Breeds like these may not reach harvest size until they are 12 weeks old. When your chickens have reached harvest size, plan a day to harvest them. It’s easier to plan ahead and make sure that you have help, even if you’re only harvesting a handful of chickens.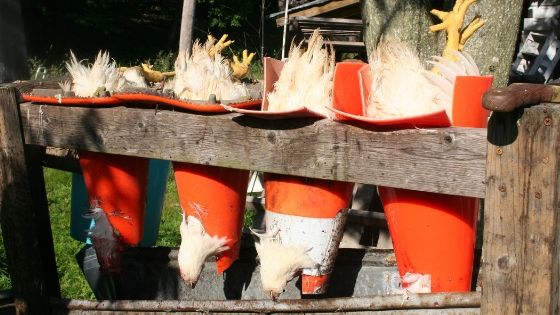
Remove feed from the chicken’s coop the evening before you plan on harvesting them. Chickens will consume feed and fill their crop up. A full crop makes the cleaning portion of harvesting more difficult. It’s much easier to clean up a chicken that had an empty crop than one with a full crop.
You’ll need kill cones, a sharp boning knife, a pot of scalding water and shrink wrap bags made for chickens. If you don’t have kill cones, you can clean up old milk jugs and cut the bottoms out of them. Hang them upside down on a tree in place of a kill cone.
Put the chickens head first into the kill cone and pull the head gently through the end. On the side of the chicken’s neck, locate the vein. Use the sharp boning knife to sever the vein. Be careful not to cut the windpipe. The goal is to bleed the chicken out completely. If you cut the windpipe, the chicken may die before all of the blood has left the chicken. It will take a few minutes for the chicken to die. Once the chicken has stopped bleeding and moving, it’s ready for the scalding water.
Scalding water is used to loosen the feathers on the chicken so that plucking is easier. We use a large crawfish pot or turkey cooker over a propane flame as a scalding pot. Fill it with water before you start killing chickens and get it heating up. The water should be steaming and just before boiling, around 190 degrees. Grab the chicken by the feet and completely submerge it into the water for 3-5 seconds. Pull it back out of the water and try to remove some of the feathers. If they slip right out, start plucking it. If the feathers still resist, then dip it back into the water again.
When all of the feathers are removed, you can cut off the head and feet. If you want to save the feet, dip them into the scalding tank and rub off the yellow layer of skin. Carefully cut around the cloaca, making a hole large enough to remove the innards. Be careful not to cut any of the intestines in the process. Take the boning knife and cut around the esophagus and trachea to loosen them. When you pull the intestines and other innards out, they should come out with it.
Clean up the carcass and place them into the shrink wrap bags. You can seal the bags now or later. Shrink wrap bags are dipped into hot water and shrink up around the chicken. Put the chicken in the refrigerator for 24-48 hours. This allows the chicken’s muscles to relax and helps it not be tough. After time in the fridge, they can go into the freezer.
If you’re looking for reasons to raise dual purpose breeds that both lay eggs and provide meat here are some other benefits of Dual Purpose Breeds.