There are few things more exciting than the day a peeping box of baby chicks arrives from the post office or comes home from the farm store. Those little fluff balls are usually only a couple of days old, and without a mother hen to tuck them under her wings, every bit of their care now falls to you. The good news is that learning how to make a simple chick brooder is far easier than most first-time keepers expect. With a few around-the-house items and a reliable heat source, you can give your chicks a warm, safe start without spending much money at all.
For nearly all of the 6,000 or so years that chickens have been domesticated, the only way chicks came into the world was under a broody mother hen. She would patiently incubate her eggs for three weeks, then switch instantly into mom mode, keeping the babies warm, showing them how to find food and water, and shielding them from danger. That changed with the invention of artificial incubation. While the ancient Egyptians may have figured out incubation long ago, it was George Ertel who patented chicken incubators and brooders in 1892, a breakthrough that made the modern chicken industry possible. Today, nearly every baby chick hatches in an incubator, which means it is up to keepers like you to play the role of surrogate mother hen.
New to backyard chickens?
FlockJourney is your go-to resource for flock care, breed guides, and poultry tips straight from the experts at Hoover’s Hatchery.
Buy a Brooder or Build Your Own?
There are really only two ways to get a brooder: buy a commercial one or make your own. Commercial brooders are convenient and safe, and they are money well spent for anyone who plans to raise many batches of chicks year after year. For most backyard families, brooding a single small group, though, a homemade setup works just as well. A simple chick brooder needs to do everything a mother hen would do, which means keeping the babies warm, dry, and protected until they feather out and are ready to join the flock. If you want a head start before your chicks arrive, our guide on preparing for chicks to arrive walks through the timing and supplies in detail.
Most families brood anywhere from a half dozen to 25 chicks at a time, and the equipment list stays the same no matter which route you choose. Every brooder, store-bought or homemade, needs five basics: a brooder box, a feeder, a waterer, a heat source, and a thin layer of bedding. Get those five things right, and your chicks will thrive.
Choosing a Brooder Box
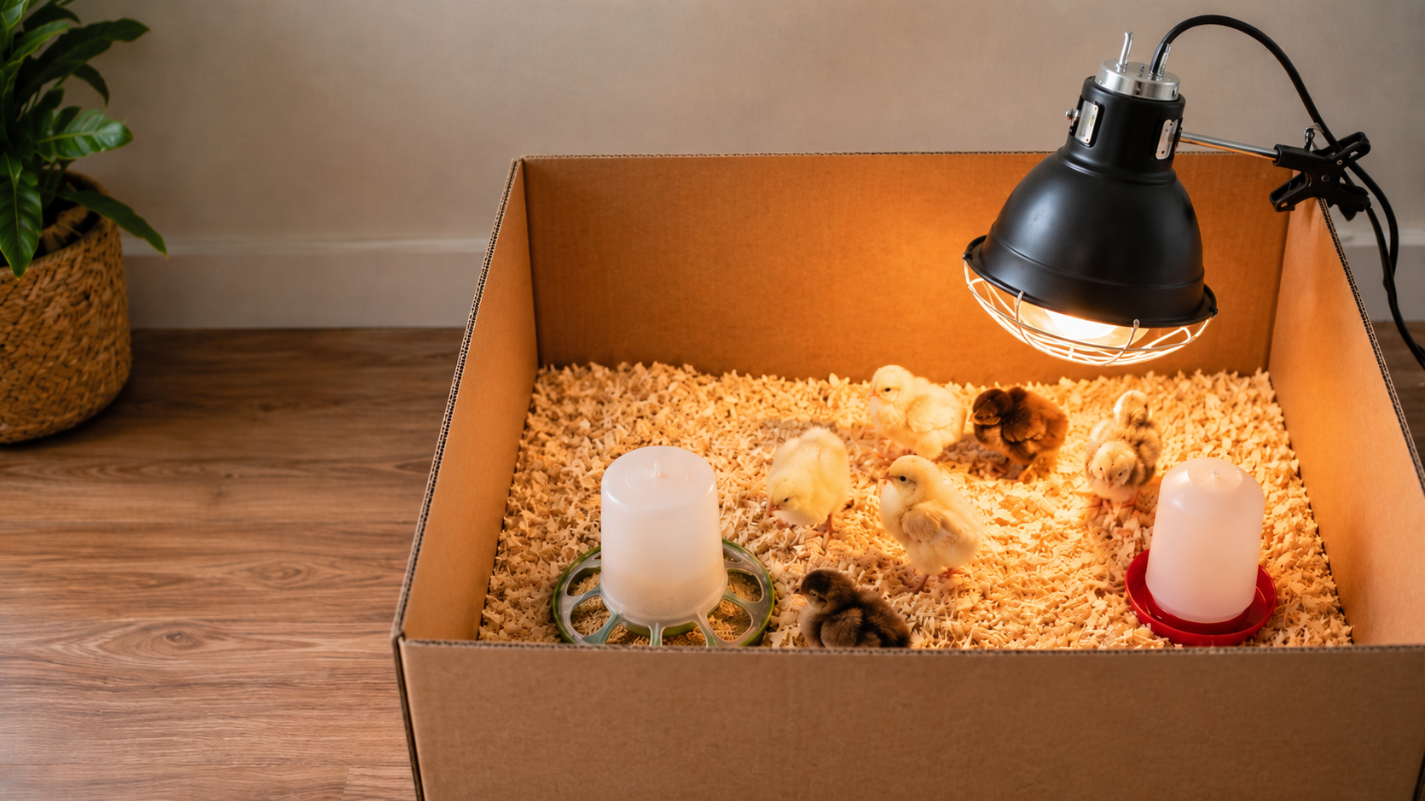
The brooder box is simply the enclosure that keeps your chicks contained, warm, and safe from drafts. You almost certainly have something around the house that will work. A big cardboard box is a classic choice because it is free, easy to replace when it gets dirty, and holds heat well. Cutting the corners round and securing them with duct tape removes the tight spaces where chicks can pile up and smother, and a flat piece of cardboard laid across the top makes a perfect lid to retain warmth. A large plastic storage tote is another excellent option since it wipes clean in seconds and lets you watch the babies through the sides.
Whatever container you pick, make sure it is roomy enough that the chicks can move toward or away from the heat as they please, and tall enough to keep them from hopping out once they start testing their wings. Baby chicks are surprisingly capable fliers within just a couple of weeks. A simple cover of hardware cloth across the top keeps them in and keeps curious pets out.
Setting Up the Right Heat Source
Heat is the single most important part of any brooder because newly hatched chicks cannot regulate their own body temperature. In place of a mother hen’s warmth, you will need an artificial heat source, most commonly a heat lamp or a brooder heating plate. If you use a clamp-style heat lamp, secure it well so it cannot fall, and keep the hot bulb away from anything flammable. One important tip is to skip modern LED and compact fluorescent bulbs, since they produce almost no heat. Old-fashioned incandescent or dedicated heat-lamp bulbs are what actually warm the brooder. Using two fixtures is a smart safeguard, because if one bulb burns out overnight, the second keeps your chicks from getting chilled.
The correct wattage depends on the size of your box, how well it holds heat, and the temperature of the room around it, so expect to experiment a little. According to Hoover’s Hatchery, the brooder floor should sit around 95 degrees Fahrenheit for very young chicks during their first week. After that first week, lower the temperature by about five degrees each week until the chicks are partially feathered and the surrounding air is warm enough that they no longer need extra heat. The chicks themselves are the best thermometer you have. If they huddle tightly together right under the lamp, they are too cold. If they press against the far walls away from the heat, they are too hot. When they are milling about the whole brooder comfortably, the temperature is just right. For a deeper look at managing warmth and bedding over the following weeks, our guide to maintaining a chick brooder covers the full routine.
Not sure which breed is right for you?
Browse our complete breed guides to find the perfect match for your flock goals, climate, and lifestyle.
Feeders and Waterers
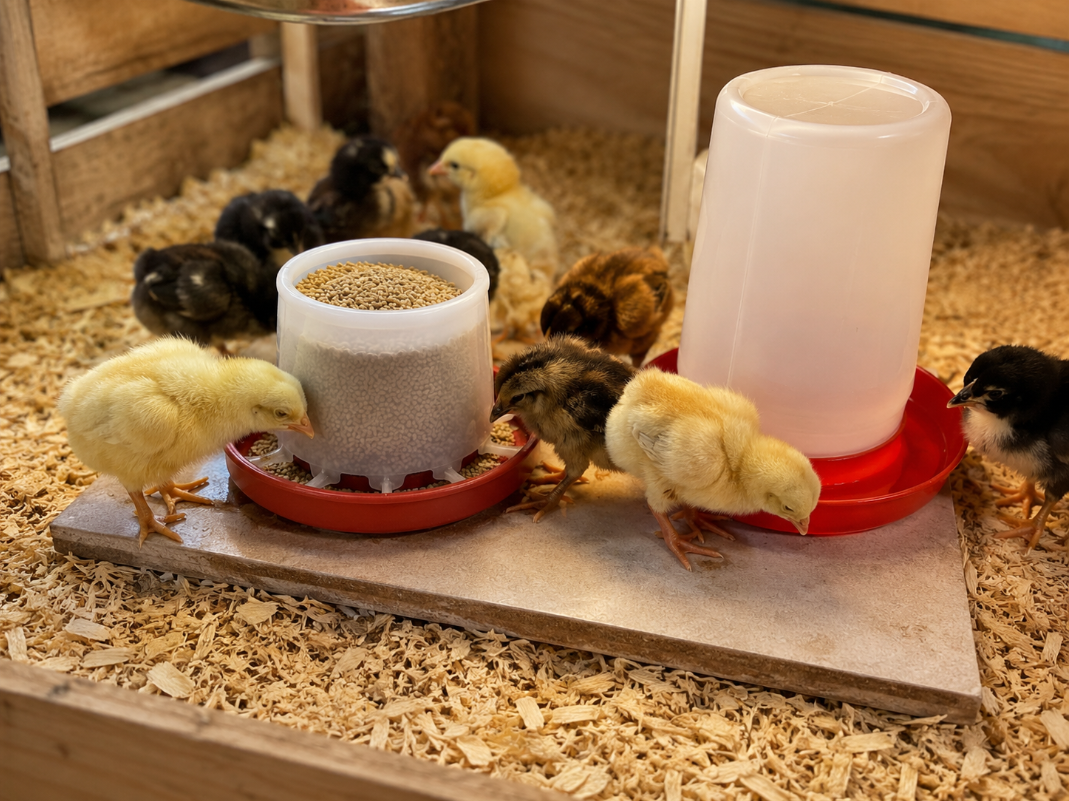
Feeding and watering equipment is refreshingly simple and inexpensive. Almost any store that sells baby chicks also sells the small plastic feeders and waterers designed for them, and they cost very little. A pulp egg carton can serve as a temporary feeder in a pinch, but a proper plastic feeder is more durable, lasts longer, and keeps the chicks from spilling and wasting their food. The same goes for a purpose-built chick waterer, which has a narrow trough that prevents the babies from climbing in, getting soaked, or accidentally drowning.
A handy trick is to set both the feeder and the waterer on a thin piece of wood or a tile raised slightly above the bedding. This keeps the chicks from kicking shavings into their food and water as they scratch around, which means cleaner supplies and far less refilling for you. Fill the feeder with a quality chick starter feed, and keep fresh water available at all times. You can stock up on a complete starter setup along with your birds when you order baby chicks from Hoover’s Hatchery, which also carries the coops and brooding supplies your flock will grow into.
Bedding for a Clean, Dry Brooder
The final piece is bedding, and a thin layer is all you need. Pine wood shavings are the most popular choice because they are absorbent, soft underfoot, and easy to scoop out when soiled. Some keepers start with paper towels for the first few days so the chicks learn to recognize their feed before transitioning to shavings. Whatever you choose, keep the bedding dry and refresh it often, since damp, dirty bedding is one of the fastest ways for chicks to get sick. A non-slip surface under the bedding also helps prevent leg problems in very young chicks.
Finally, think carefully about where you place the brooder. A shed, garage, or workshop with a power source and good ventilation is ideal. It is best to avoid keeping chicks inside your home, since they create a surprising amount of dust quickly and can carry germs. Once your babies have outgrown the brooder but are still too small for the main coop, a movable chicken tractor makes a perfect in-between home, as our overview of the chick journey through weeks two to four explains.
Frequently Asked Questions
What do I need to make a simple chick brooder?
You need five basic items: a brooder box, such as a large cardboard box or plastic tote, a chick feeder, a chick waterer, a heat source like a heat lamp or brooder plate, and a thin layer of absorbent bedding such as pine shavings. These five essentials cover everything a mother hen would normally provide for her chicks.
How warm should a chick brooder be?
The brooder floor should be about 95 degrees Fahrenheit for very young chicks during their first week. Lower the temperature by roughly five degrees each week afterward until the chicks are feathered out and no longer need supplemental heat. Watch the chicks themselves, as huddling means too cold and scattering to the edges means too hot.
What kind of light bulb works best in a brooder?
Use old-fashioned incandescent or dedicated heat-lamp bulbs, because modern LED and compact fluorescent bulbs produce almost no heat. The exact wattage depends on your box size, insulation, and room temperature, so a little experimenting helps. Running two fixtures is wise, so a single burned-out bulb cannot leave your chicks cold.
How long do chicks stay in the brooder?
Most chicks stay in the brooder for about six to eight weeks, until they are fully feathered and roughly half to two-thirds of their adult size. By then, they can regulate their own body temperature and are ready to transition outdoors. A chicken tractor is a handy halfway home before they move into the main coop.
Building a simple chick brooder really comes down to recreating the warmth, food, water, and protection a mother hen would provide, and you can do it with items you likely already have on hand. Get the box, heat, feeder, waterer, and bedding sorted before your chicks arrive, and those first weeks of brooding become one of the genuine pleasures of keeping a backyard flock. With a little attention and a lot of peeping, your fluffy newcomers will be feathered and flock-ready before you know it.
Ready to start your flock?
Hoover’s Hatchery ships healthy, vaccinated chicks straight to your door from hatcheries across the US. Over 200 breeds available.