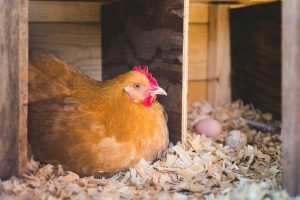
Do you have hens? Are they currently laying eggs all over the place? If you’re tired of collecting eggs from under the shed, in the rim of that old tire or in the seat of your truck when the windows are down… then it’s time that you give your hens some proper nesting boxes. Buying nesting boxes can be expensive and you may not like the way they look. Making nesting boxes yourself is very simple and only requires a few basic tools like a saw, a hammer and nails or a drill and screws.
A nesting box is a space that is used solely for the purpose of hens laying eggs. It provides a safe, sheltered space where she can lay her eggs and feel secure. Most hens like to feel hidden while laying, which is why they seem to find the strangest place to lay eggs.

Designing A Nesting Box
A nesting box should be large enough to comfortably fit a hen, but not too large that they don’t feel secure. For average sized hens like a Rhode Island Red, a nesting box should be 12” wide, 12” deep and 12” tall. This provides the perfect space for her to get in and out comfortably. Larger hens, like Brahmas, will need a slightly larger space. Use these dimensions for a really large breed: 18” wide, 18” deep and 18” tall.
The easiest material to build your nesting boxes out of is with wood. You can use plywood to build your boxes. When you’re designing your nesting boxes, keep in mind that your hens want to feel hidden. Your nesting boxes should have three full sides (the back, left and right sides), a solid bottom and a top. We design our nesting boxes to have a partial front. The front piece comes up about 4”. This helps to hold in any bedding that you put into the nesting box.
Although a flat top will work, you may want to try a sloped top. A sloped top will help to keep chickens from trying to roost on the top of the nesting box. When chickens roost on top of the nesting box, they will poop on it. This can get poop inside of the nesting boxes, which leads to dirty eggs.
Cut your wood pieces out and fasten them together with a hammer and nails or a screwdriver and screws. As long as the dimensions are right, you can design the boxes in whatever shape you’d like.
You’ll want to have more than one nesting box for your hens, but you won’t need one for each hen. The hens in your flock will generally choose one or two nesting boxes that are their favorite and use those. If you have a flock of six hens, three nesting boxes is plenty.
Setting Up Your Nesting Boxes
Once your nesting boxes are made, you’ll want to hang them in the coop. Most people prefer to put them up against one another in rows. Don’t put them at the ground level. Set them up off of the ground a few feet. This will help to keep the inside of the boxes clean.
The nesting boxes should be lower than your lowest roosting pole. Chickens like to roost as high as possible, so if your nesting boxes are higher than any of your roosting poles, they’ll roost in your nesting boxes instead, which will quickly lead to dirty nesting boxes and dirty eggs.
If you need to adjust your roosting poles, do that first.
Once your nesting boxes are hung, fill them with bedding. Avoid using straw or hay, as it can hold mites. Sand, pine flake bedding, or small animal bedding are the best options. Keep the bedding clean and remove any soiled bedding. THis will ensure your eggs stay clean.
You’ll know that you’ve built a good nesting box when your hens start using it. If they’ve been laying somewhere else, you may need to train them to the nesting boxes. You can do this by placing eggs they laid or fake eggs in the nesting boxes. When they see the eggs in the nesting boxes, they’ll start to associate that space with laying eggs.