popular videos
FROM OUR BLOG
Why is My Chicken Panting? What it Means and What to Do About it
It’s a hot summer afternoon. You head out to check on your flock and notice something alarming. Your hens are standing still with their beaks wide open, breathing fast. Some are holding their wings away from their bodies. Your first instinct might be to worry, and you should listen to that instinct!
Your chickens are panting, and they’re telling you something really important. The heat is getting to them.
Here’s what’s happening inside your hens and why it matters.
Why Chickens Pant (And Why They Can’t Just Sweat it Out)
Unlike humans, chickens have no sweat glands. When temperatures rise, they can’t cool down the same way we do. Instead, they rely on panting or breathing rapidly with an open beak as their primary way to release heat from the body through evaporation.
They also hold their wings out away from their sides to expose the less-feathered skin underneath, giving body heat a path to escape. It’s a clever system, but it has real limits.
When temperatures climb above 85°F, you’ll start to notice these behaviors increasing. Once the mercury passes 100°F, your flock is at serious risk. And the hidden danger is that humidity makes everything worse.
At relative humidity above 50%, a chicken’s ability to cool itself through panting starts to drop sharply. Above 75% humidity, panting becomes nearly ineffective. The combination of high heat and high humidity is the most dangerous scenario your flock can face.
The Real Health Risks of Panting
Panting isn’t just uncomfortable, it takes a real toll on your hen’s body. All that rapid breathing throws her internal balance off, and when her body works overtime trying to compensate, it often has to pull resources away from egg production. This can result in soft-shelled eggs, fewer eggs and a flock that’s running on empty.
Panting also accelerates water loss. During extreme heat, chickens can drink four to five times their normal water intake just trying to keep up. Without proper replenishment, dehydration and electrolyte imbalance set in fast and that’s where things can turn from uncomfortable to life-threatening.
Recognizing the Stages of Heat Stress
Knowing how to read your flock is the difference between a hot day and a danger zone. Here’s what to watch for:
-
Mild heat stress: Light panting with beak open, otherwise acting normal. Your hen is hot but managing. Provide shade, fresh cool water and increased airflow immediately.
-
Moderate heat stress: Heavy panting, wings held out from the body, slightly crouching. She’s working hard to cool down. This is your signal to act fast! Get her out of the heat right away, place her in the shade and add electrolytes to her water.
-
Severe heat stress/heat exhaustion: Pale or discolored comb and wattles, lethargy, weakness or limpness. This hen is in danger. Cool her down quickly by submerging her body (not her head) in cool but not icy water, then move her to a shaded, ventilated space and monitor her closely. Seek veterinary guidance if she doesn’t improve.
Don’t wait for severe heat stress stage. Catch it early and support your flock before it escalates.
Why Electrolytes Are Non-Negotiable in the Heat
When chickens pant and drink more water to compensate for the heat, they’re not just losing water, they’re losing the vital electrolytes that keep their bodies functioning. Electrolytes like sodium and potassium regulate fluid balance, muscle function and nearly every system in the body.
Plain water alone won’t replace what’s lost. Think of it this way: when you sweat through a hard workout, water quenches your thirst but sports drinks restore your balance. Your hens need the same support.
This is exactly where Flock Fixer comes in!
Meet Your Flock’s Summer Secret Weapon
Flock Fixer is a vitamin-rich water additive specifically designed to support your flock during times of challenge, including the heat of summer.
It includes:
-
Electrolytes to help restore hydration and fluid balance lost through panting and increased water intake
-
Prebiotics and probiotics to support digestive health, which can be disrupted during heat stress
-
Organic oregano essential oil, known for its natural immune-supporting properties
-
Vitamins to restore vital nutrients and keep your birds resilient
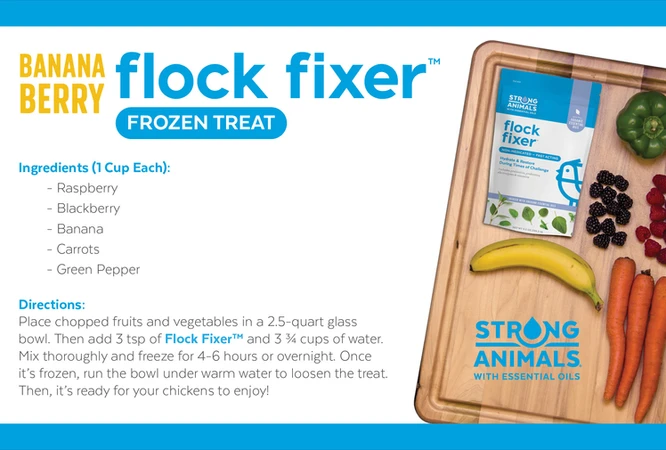
Flock Fixer Frozen Treats
When the thermometer climbs past 85°F, here’s a simple way to cool your flock down and give them something to peck at: make Flock Fixer frozen treats!


Your Summer Heat Checklist
Panting is a warning sign, but it doesn’t have to become a crisis. Stay ahead of the heat with these daily habits:

Your hens can’t tell you they’re struggling, but their open beaks and drooping wings can. When you see those signs, act quickly. With the right care and the right support, your flock can stay comfortable, healthy and laying even through the hottest days of summer.
Stay cool friends!
-The Wing Lady
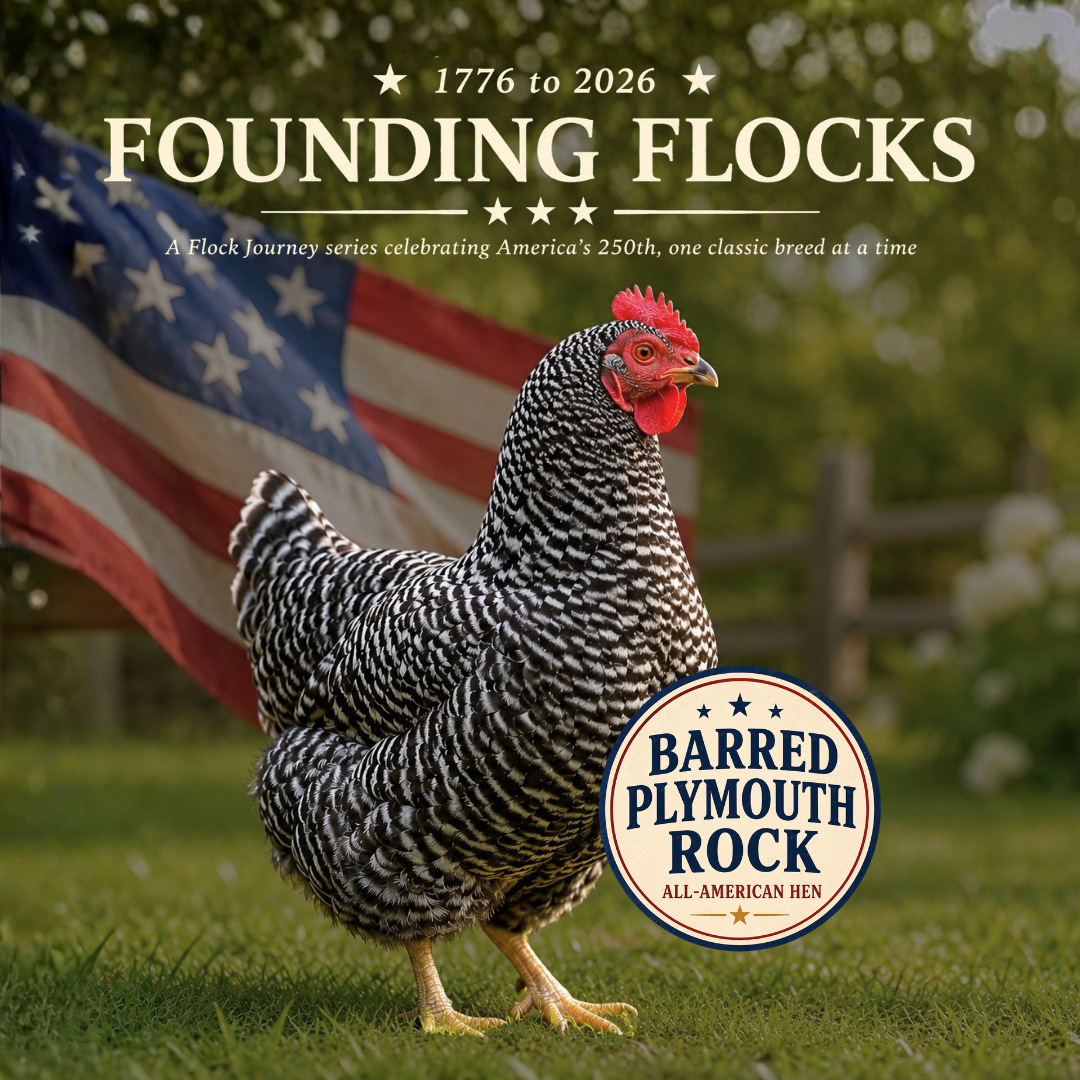
America 250 Series, Part 3: Barred Plymouth Rock
Close your eyes and picture a chicken. Odds are you just pictured this one. The black-and-white striped hen scratching around the barnyard is the Barred Plymouth Rock, and for the better part of a century it was the most common chicken in America. Week three of our America 250 series belongs to the bird that became the picture of the American backyard.
Top 3 Takeaways
- It’s the chicken everyone pictures. The barred black-and-white hen is the storybook American farm chicken, and it was one of the most popular breeds in the country for generations.
- It does a little of everything. About 250 large brown eggs a year, a famously gentle temperament, a sturdy 5 to 6 pound frame, and the hardiness to keep laying through a northern winter.
- It’s related to last week’s breed. Cross a Barred Plymouth Rock hen with a Rhode Island Red rooster and you get the Black Sex-Link, one of the most popular backyard layers there is.
The 7 founding breeds of the American backyard
We’re profiling one per week from now until America’s 250th birthday. Here’s the full All-American lineup, with three down and four to go:
- America’s oldest breed, traced to roughly 1750. Featured in Part 1.
- Rhode Island Red. The late-1800s layer that parented half the modern hen house. Featured in Part 2.
- Barred Plymouth Rock. The black-and-white farm classic, about 250 large brown eggs a year. This week’s feature.
- An American original, known for laced feathers and a cold-friendly rose comb. Up next.
- Jersey Giant. Born in New Jersey and still one of the largest breeds you can keep.
- New Hampshire. Refined in New England from Rhode Island Red stock for faster growth and dependable laying.
- Developed in 1940 in the state it’s named for. About 260 large brown eggs a year.
Breed of the Week: The Barred Plymouth Rock
If the Rhode Island Red modernized the American backyard, the Barred Plymouth Rock defined what it looked like.
Developed in New England in the mid-1800s, the Plymouth Rock became the all-American farm chicken, the bird on the storybook farm and in the family flock, common from New England barnyards to homesteads out west. Its calling cards were a friendly disposition and a reliable delivery of brown eggs, and that combination made it the most kept breed in the country for generations.
What makes the Barred Plymouth Rock great
Temperament. Barred Rocks are calm, friendly, and easygoing, the kind of bird that follows you around the run and loves a child’s hug. That temperament is so reliable that breeders cross specifically for it. The Black Sex-Link is built to carry the Barred Rock’s personality forward.
Eggs. Expect about 250 large brown eggs a year, laid steadily, including through the short dark days of winter when many breeds slow down. That’s a dependable basket from a breed that’s been earning its keep on American farms for more than a century.
Build. At a sturdy 5 to 6 pounds with a single comb and unmistakable crisp black-and-white barring, the Barred Rock looks classic: a rounded shape and a broad, deep chest that reads as solid and well-proportioned. It’s hardy in the cold and easy to keep.
The bird behind more birds than you’d think
Like the Rhode Island Red, the Barred Plymouth Rock is a foundation breed, the kind others come from. Cross a Barred Rock hen with a Rhode Island Red rooster and you get the Black Sex-Link, a versatile brown egg layer that carries the Barred Rock’s gentle temperament and the Red’s winter grit. Cross the Barred Rock with a White Leghorn and you get the California Grey, a barred white-egg layer. Pair it with a Blue Australorp and you get the striking Blue Plymouth. The bird everyone pictures turns out to be the bird everyone builds on.
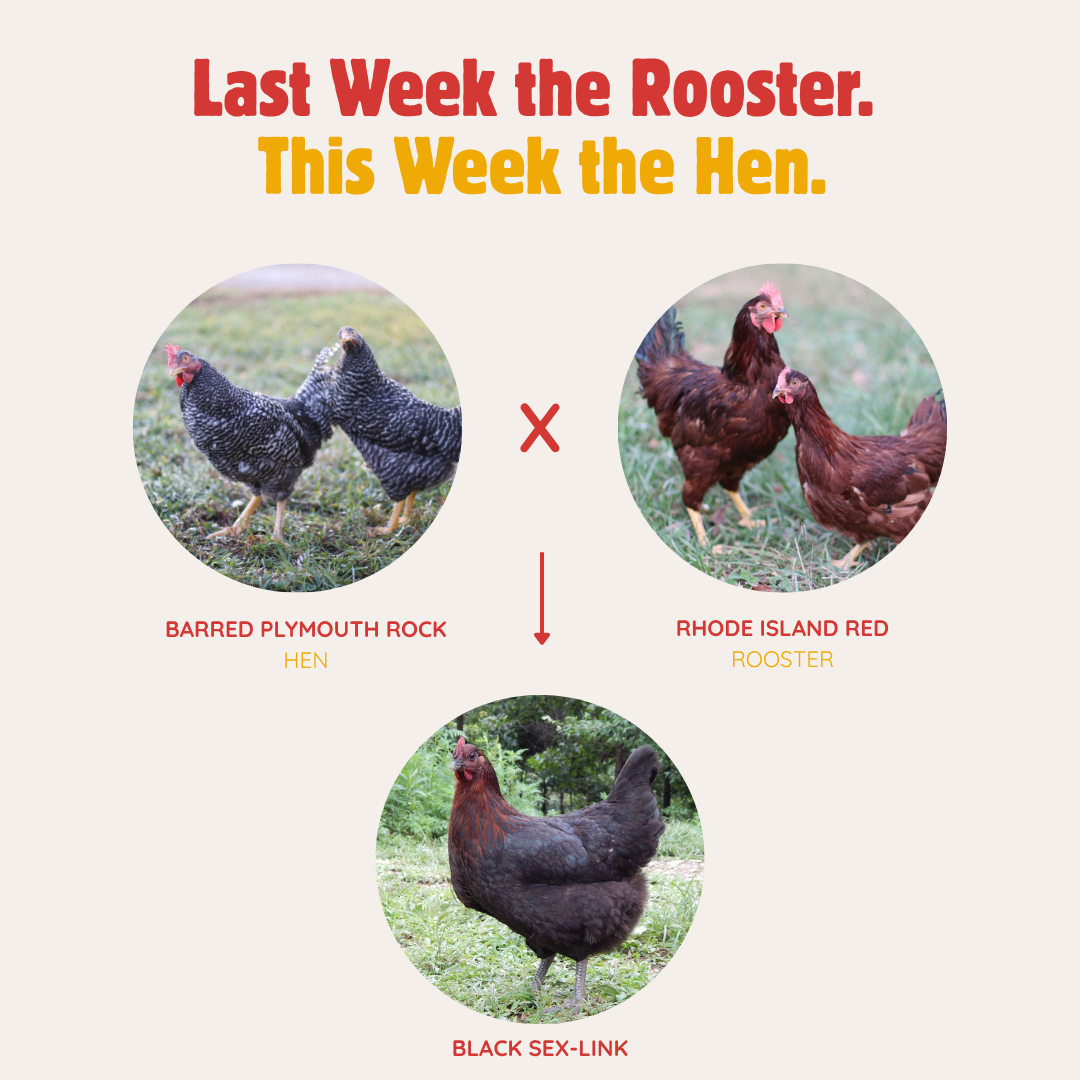
Last week we told you the Rhode Island Red rooster parents half the modern hen house. Here’s where that story comes back around: cross that same rooster with a Barred Plymouth Rock hen and you get the Black Sex-Link. Put the two together and you’ve met the parents of one of the most popular layers in the backyard.
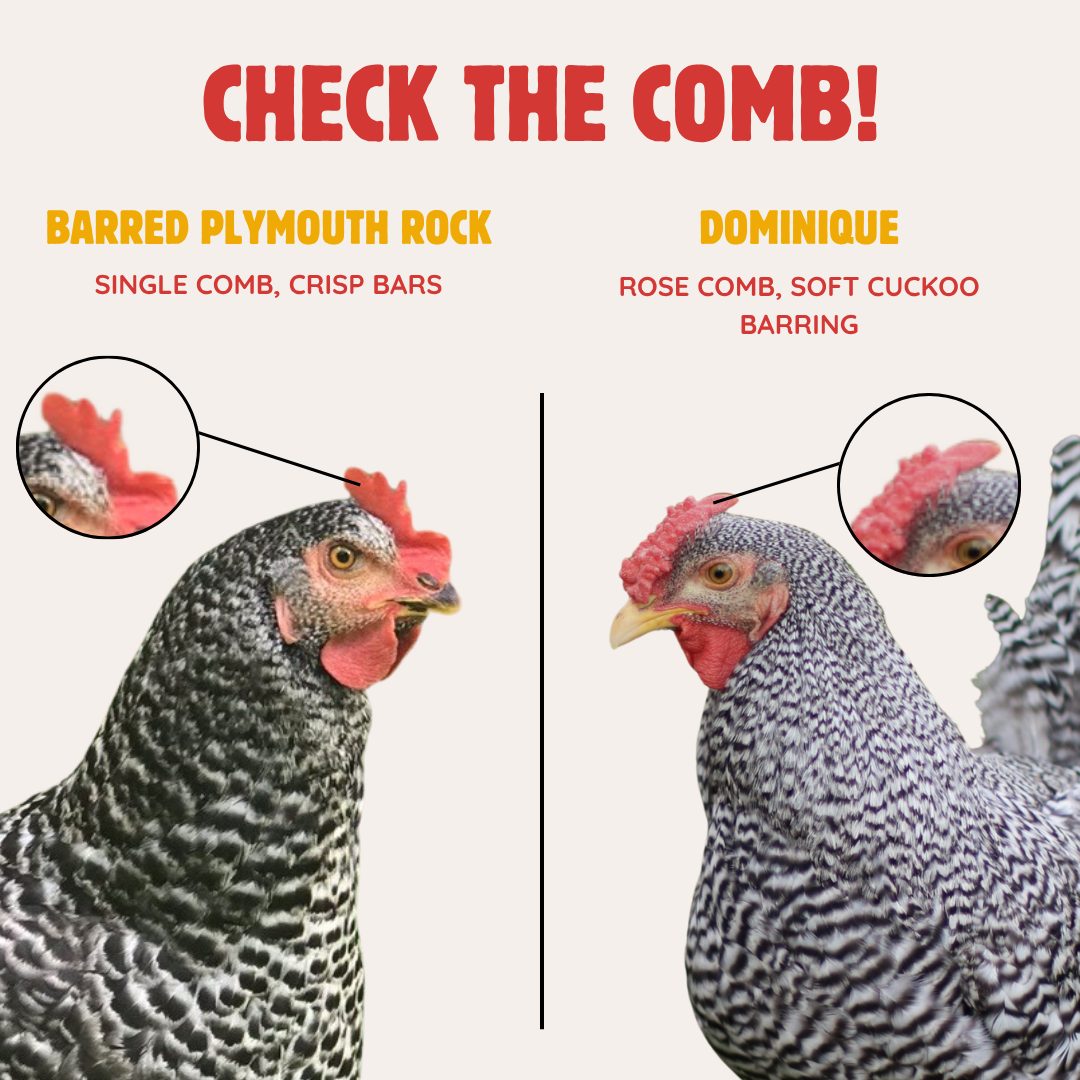
Barred Plymouth Rock or Dominique? How to tell them apart
The Barred Plymouth Rock and our week 1 breed, the Dominique, are commonly confused due to very similar appearances. Here’s one way to tell them apart:
A Barred Plymouth Rock has a single comb and crisp, clearly defined black-and-white bars that run clean across each feather. A Dominique has a rose comb that sits low and flat against the head, with softer, more staggered barring often called cuckoo. Check the comb first: upright and single means Rock, low and flat means Dominique.
Who the Barred Plymouth Rock is for
If this is your first flock, the Barred Rock is one of the best beginner birds there is: calm, hardy, forgiving, and a steady layer while you find your footing.
If you have a family, it’s gentle enough to be a favorite with kids and recognizable enough to be the chicken your children draw.
And if you just want the classic, this is the bird that defined the American backyard, the one everyone pictures when they picture a chicken.
FAQ
What is the Barred Plymouth Rock known for?
Its distinctive black-and-white barred plumage and its role as the classic American farm chicken. The Barred Plymouth Rock is a calm, hardy breed that lays about 250 large brown eggs a year.
How many eggs does a Barred Plymouth Rock lay per year?
About 250 large brown eggs a year, laid steadily, including through the winter when many breeds slow down.
Are Barred Plymouth Rocks good for beginners?
Yes. They are calm, friendly, hardy, and dependable layers, which makes them one of the best breeds for first-time keepers and families.
Where did the Barred Plymouth Rock come from?
The Plymouth Rock was developed in New England in the mid-1800s and became the most common farm chicken in America for generations.
How do you tell a Barred Plymouth Rock from a Dominique?
Check the comb. A Barred Plymouth Rock has a single comb and crisp barring, while a Dominique has a low, flat rose comb and softer, more staggered barring.
What breeds come from the Barred Plymouth Rock?
The Barred Rock is a parent of several popular crosses, including the Black Sex-Link (with a Rhode Island Red rooster), the California Grey (with a White Leghorn), and the Blue Plymouth (with a Blue Australorp).
Raise a piece of American history
At Hoover’s Hatchery, we think there’s no better way to celebrate America 250 than starting or growing a flock of your own. The Barred Plymouth Rock is about as American as a chicken gets. It’ll fill your basket, charm your kids, and put the most recognizable bird in the country in your own backyard.
Coming up next…
Next week we meet an American original known for its beautiful laced feathers and a rose comb built for cold country: the Wyandotte. Until then, the Barred Plymouth Rock is ready for your backyard. Learn more or add them to your flock at www.hoovershatchery.com/barred-plymouth-rock
FlockJourney is brought to you by Hoover’s Hatchery, the nationwide leader in backyard poultry. For more than 80 years, Hoover’s has lived its values of Excellence, Tenacity, Servitude, Humility, and Ingenuity while 100% focused on backyard poultry. From chickens, ducks, and pheasants, to turkeys, geese, guineas, quail, bantams, and rare breeds, Hoover’s has the best variety and the highest quality genetics in the industry. Find Hoover’s chicks at your local farm store or shop online at www.hoovershatchery.com.
Rhode Island Red: The All-American Hen Behind Half Your Favorite Layers
Top 3 Takeaways
- The Rhode Island Red is America’s most-raised backyard hen. In a recent Hoover’s survey of 253 backyard keepers, 66% had raised one. That’s two of every three keepers, and no other brown egg layer comes close.
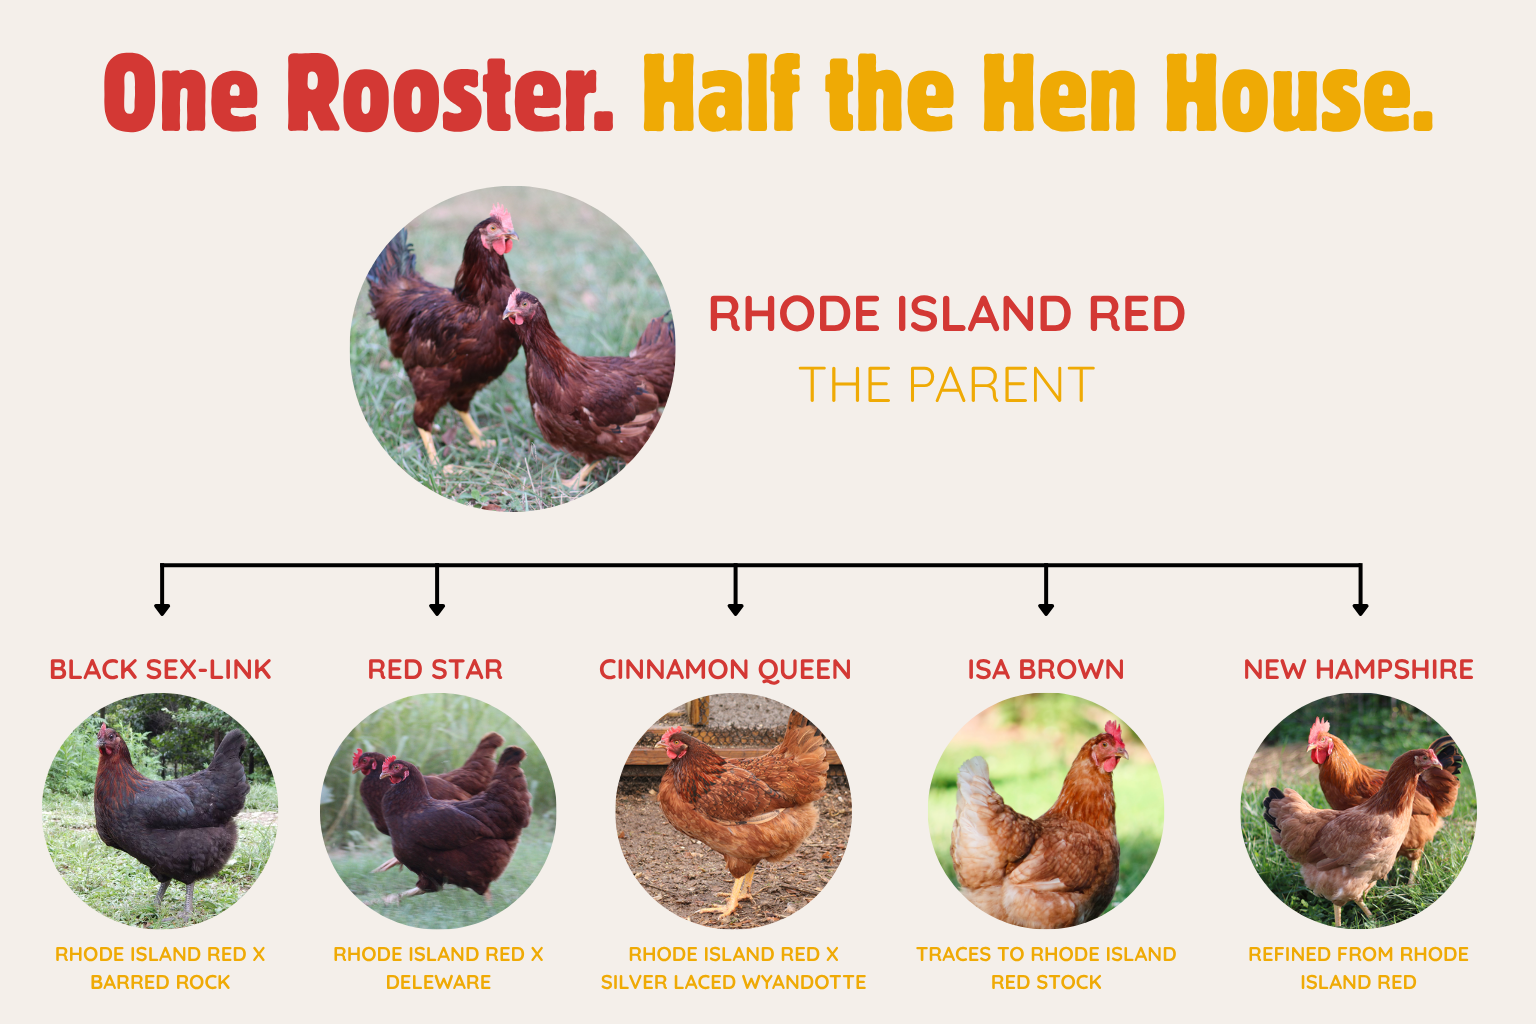
- You may already be raising its descendants. The Red Star, Black Sex-Link, Cinnamon Queen, and ISA Brown all trace back to a Rhode Island Red parent, and the New Hampshire was refined straight from Rhode Island Red stock. One breed from one small state is the genetic backbone of the modern hen house.
- It delivers exactly what keepers say they want. About 265 large brown eggs a year, a gentle temperament, and the cold hardiness to lay through an Iowa winter. When keepers choose a laying breed, 65% rank production reliability first and 56% rank cold and heat hardiness. The Rhode Island Red checks every box.
The breed from the smallest state that changed everything
Last week we started before the beginning, with the Dominique, the oldest chicken in America. This week we jump ahead about a century to the breed that reshaped the American backyard from the ground up.
Rhode Island may be the smallest state in the union, but the bird developed there in the late 1800s made some of the biggest changes in the history of chicken keeping. The Rhode Island Red could lay about 265 eggs a year at a time when that kind of output was almost unheard of, and word traveled fast. Within a generation it was famous worldwide, and breeders everywhere reached for Rhode Island Red roosters to build better layers. They are still reaching for them today.
Breed of the Week: The Rhode Island Red
If the Dominique is the bird that fed colonial America, the Rhode Island Red is the bird that modernized it.
It was developed in the late 1800s in Rhode Island, and its calling card was production. These glossy mahogany hens with black tail feathers could lay around 265 large brown eggs a year, and they did it reliably, in heat and in cold, without much fuss. That mix of output and toughness made the Rhode Island Red famous worldwide and turned it into the breed other breeds are built from.
What makes the Rhode Island Red great
Temperament. Rhode Island Reds are gentle, confident, and easy to have around. They’re curious without being needy, which makes them a favorite for families and first-time keepers alike.
Eggs. Expect about 265 large brown eggs a year. That’s one of the most dependable baskets you can ask for from a standard breed, and it’s a big reason the Rhode Island Red has stayed at the top of the backyard for more than a century.
Build. At a mature 6 to 7 pounds with a single comb and that signature glossy mahogany plumage, the Rhode Island Red is a true dual-purpose bird. It’s hardy in all conditions and built to keep laying through the short, dark days of winter, when lighter breeds slow down.
The bird behind half your favorite layers
Here’s something most keepers don’t realize: if you’ve raised a popular brown egg layer, there’s a good chance you’ve already raised a Rhode Island Red, or at least its child.
The Rhode Island Red rooster is the go-to parent for the modern hybrid layer. Cross him with a Silver Laced Wyandotte hen and you get the Cinnamon Queen. Cross him with a Delaware hen and you get the Red Star, a bird that can push past 320 eggs a year. Cross a Barred Rock hen with a Rhode Island Red rooster and you get the Black Sex-Link, which carries the Rock’s easygoing temperament and the Red’s winter grit. Even the ISA Brown, the workhorse brown layer in backyards everywhere, traces its line back to Rhode Island Red stock. And the New Hampshire, another breed in this very series, was refined directly from Rhode Island Reds.
In our survey, the three most commonly raised brown egg layers were the Rhode Island Red at 66%, the ISA Brown at 47%, and the Cinnamon Queen at 27%. Look closely and you’ll notice something: all three trace back to the same small-state rooster. One breed from Rhode Island quietly stands behind a huge share of the eggs in American backyards.
Heritage or hybrid? Why keepers come back to the original
Those hybrid descendants are spectacular layers, and plenty of keepers love them. But our survey keepers told us something worth hearing: high-output hybrids tend to burn bright and fade, with laying often dropping off at two or three years. The Rhode Island Red is the heritage original they all came from, and it paces itself. You trade a little peak output for a hen that keeps laying, and keeps its personality, for years. If you want the genetics that started it all, you raise the source, not the copy.
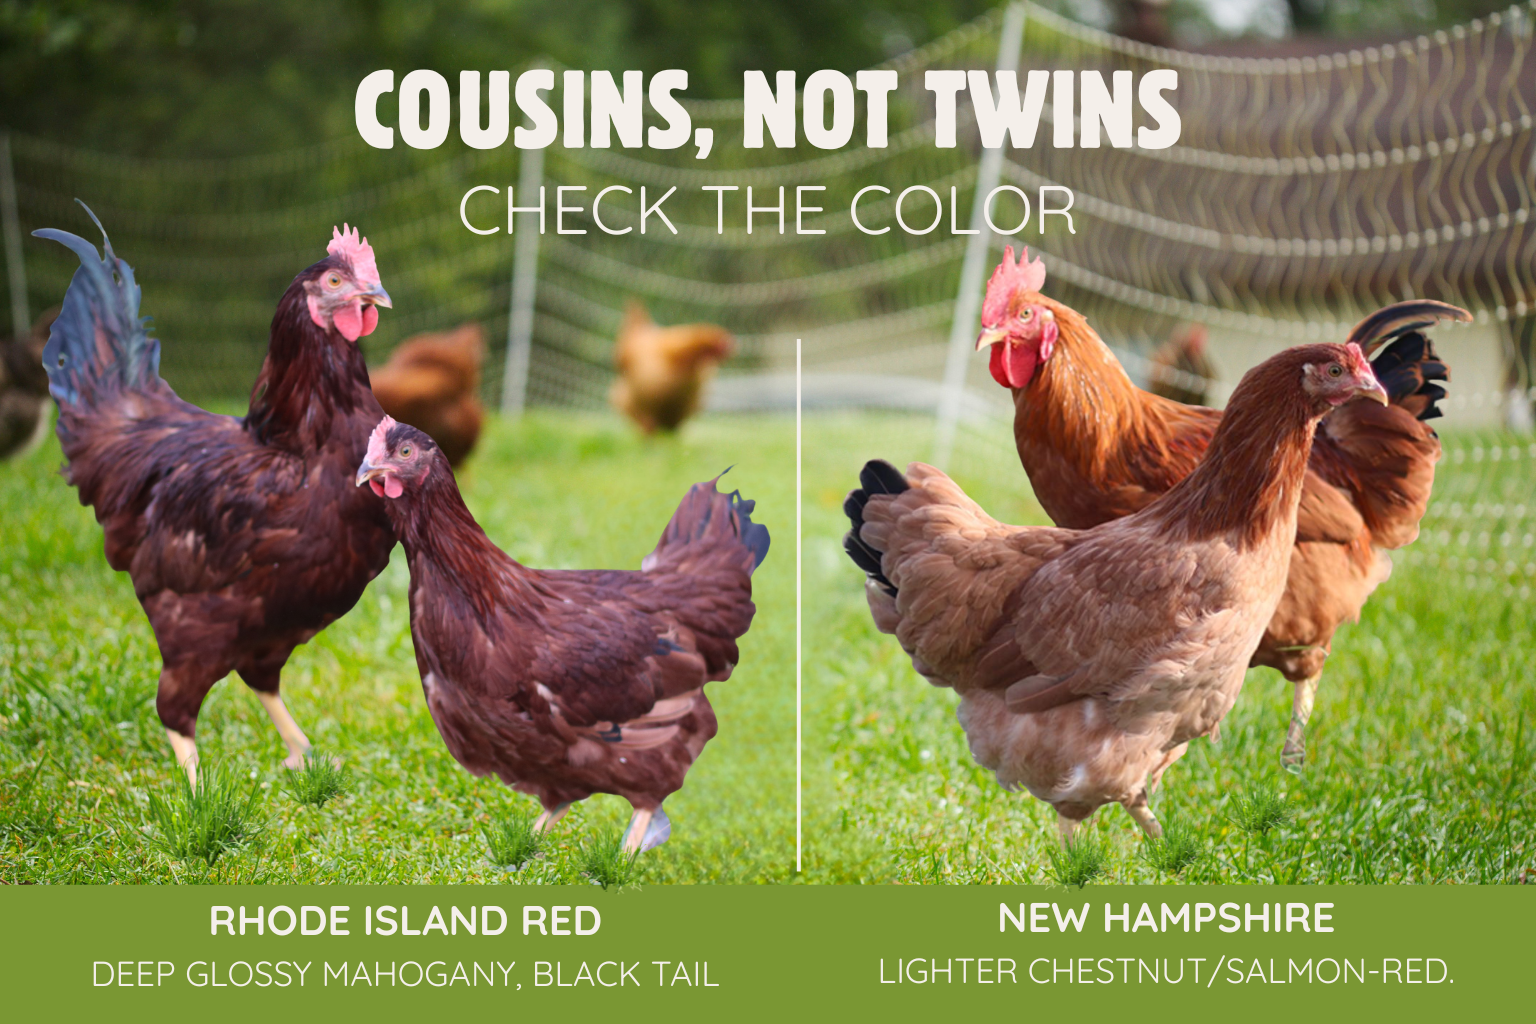
Rhode Island Red or New Hampshire? How to tell them apart
Because the New Hampshire was refined straight from Rhode Island Red stock, the two can look like cousins, and they are. The tell is the color. A Rhode Island Red is deep, dark, glossy mahogany, almost a burnished brick red, with black in the tail. A New Hampshire is noticeably lighter, a brighter chestnut or salmon-red that catches the sun. Once you’ve seen them side by side, the Red reads as the richer, deeper bird every time.
Who the Rhode Island Red is for
If this is your first flock, the Rhode Island Red is one of the safest, most rewarding birds you can choose. It’s hardy, friendly, forgiving, and it will fill your egg basket while you learn.
If you’ve kept chickens for years, this is the breed that connects your backyard to the whole history of American egg production. It’s the standard every brown layer is measured against, and it earns its keep season after season.
And if you want the most influential American chicken there is, the Rhode Island Red has a claim no hybrid can match. Half the hen house descends from it. This is the original.
FAQ
What is the most popular backyard chicken breed in America?
The Rhode Island Red. In a recent Hoover’s survey of 253 backyard keepers, 66% had raised one, making it the most commonly raised brown egg layer in American backyards.
How many eggs does a Rhode Island Red lay per year?
A Rhode Island Red lays about 265 large brown eggs a year. Its combination of high output and cold hardiness is what made the breed famous worldwide.
Where did the Rhode Island Red come from?
The Rhode Island Red was developed in the late 1800s in Rhode Island, the smallest U.S. state. Its egg production made it world-famous and it became the parent of several modern hybrid layers.
What hybrid breeds come from the Rhode Island Red?
Rhode Island Red roosters are the parent of many popular hybrids, including the Cinnamon Queen, Red Star, and Black Sex-Link. The ISA Brown traces to Rhode Island Red stock, and the New Hampshire was refined directly from it.
Are Rhode Island Reds good for beginners?
Yes. Rhode Island Reds are gentle, hardy, and dependable layers that adapt easily to a backyard, which makes them one of the best breeds for first-time keepers.
How do you tell a Rhode Island Red from a New Hampshire?
Check the color. A Rhode Island Red is deep, glossy mahogany with black tail feathers, while a New Hampshire is a lighter chestnut or salmon-red. The New Hampshire was refined from Rhode Island Red stock, so their builds are similar and color is the clearest difference.
Raise a piece of American history
At Hoover’s Hatchery, we think there’s no better way to celebrate America 250 than starting or growing a flock of your own. The Rhode Island Red is a fine place to begin. It’s the bird that built the modern backyard, it’ll fill your basket, and it carries 150 years of American know-how in every feather. And it fits in your yard.
The 7 founding breeds of the American backyard
We’re profiling one a week from now until America’s 250th birthday. Here’s the full All-American lineup, with two down and five to go:
- America’s oldest breed, traced to roughly 1750. Calm, sociable, and the subject of our Part 1 feature.
- Rhode Island Red. The late-1800s Rhode Island layer that parented half the modern hen house. This week’s feature.
- Barred Plymouth Rock. The black-and-white striped farm hen most people picture when they hear the word “chicken.” About 250 large brown eggs a year. Up next.
- An American original, known for laced feathers and a cold-friendly rose comb.
- Jersey Giant. Born in New Jersey and still one of the largest breeds you can keep.
- New Hampshire. Refined in New England from Rhode Island Red stock for faster growth and dependable laying.
- Developed in 1940 in the state it’s named for. About 260 large brown eggs a year.
Coming up next…
Next week we meet the bird most people picture when they hear the word “chicken,” the black-and-white farm classic: the Barred Plymouth Rock. Until then, the hen that started half the hen house is ready for your backyard. Learn more or add them to your yard now at www.hoovershatchery.com/rhode-island-red
FlockJourney is brought to you by Hoover’s Hatchery, the nationwide leader in backyard poultry. For more than 80 years, Hoover’s has lived its values of Excellence, Tenacity, Servitude, Humility, and Ingenuity while 100% focused on backyard poultry. From chickens, ducks, and pheasants, to turkeys, geese, guineas, quail, bantams, and rare breeds, Hoover’s has the best variety and the highest quality genetics in the industry. Find Hoover’s chicks at your local farm store or shop online at www.hoovershatchery.com.
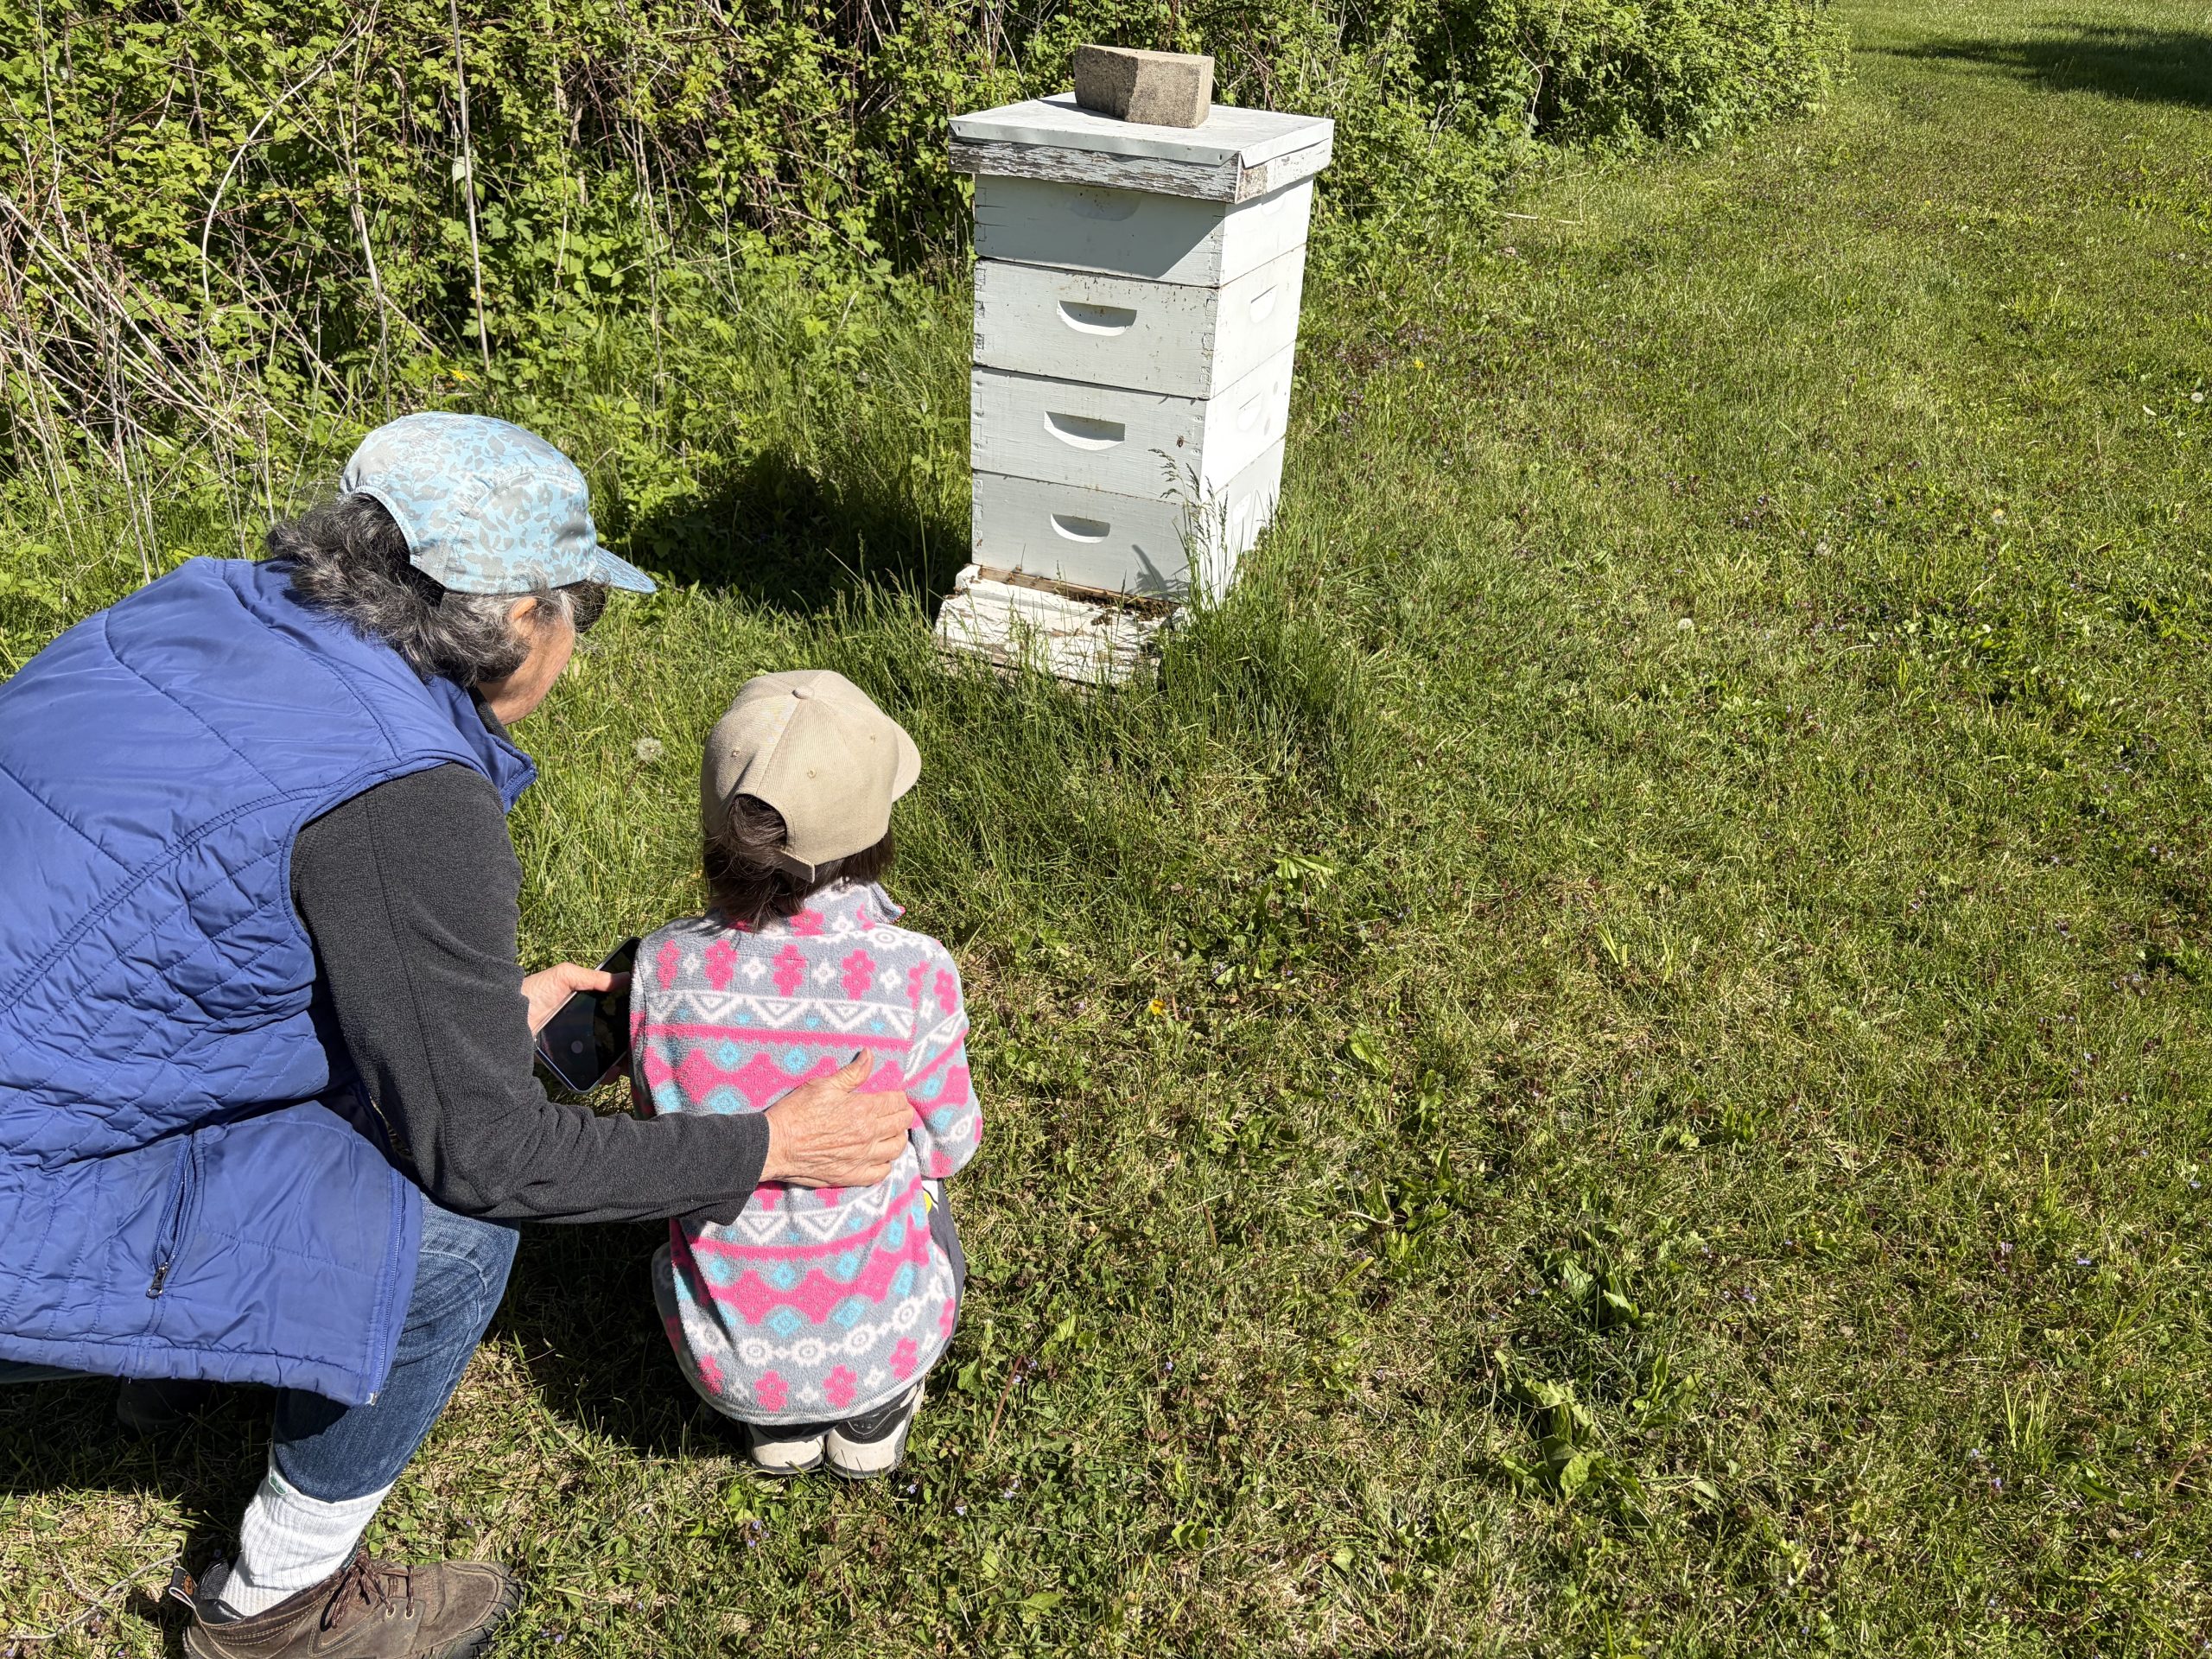
Honeybees and Chickens in the Backyard
Of all domestic food-producing animals honeybees are special. They can legally trespass!
If cows, pigs, sheep or even chickens wander off a property without permission an angry neighbor might be calling up. Bees are different. They’ll zip upwards of three miles to collect nectar and pollen. They buzz over fences and property lines to gather food for their larvae and to make into honey. Honeybees even thrive in New York City. Local beekeepers tend hives on building roofs far above the street. The industrious insects forage in parks and on domestic flowers in balcony planters.
For years we tended two hives and chickens in our Iowa backyard. We follow a foraging and gardening lifestyle so the combination brought delicious honey into our kitchen along with eggs, garden vegetables, and wild food.
Backyard honey bees and chickens are a perfect combination for a family who loves homesteading. Tending both bees and chickens is fascinating and balanced. Chickens produce protein rich eggs, while bees provide sweetener.
Beekeeping is an ancient practice. In the days before cheap sugar entered the market it was the main source of sweetener in Eurasia, where honeybees are native. Bees crossed the Atlantic Ocean with early human immigrants who tended them in towns and on farms. Some of their hives swarmed and formed new wild colonies that spread west faster than settlement, often living in hollow trees. Today many suburban backyards have enough space for both hives and a coop.
Jean Wiedenheft and Omar Salinas tend bees and chickens at the Indian Creek Nature Center’s Sugar Grove Farm near Cedar Rapids, Iowa. Although some people put their hives in the chicken run or even on top of the coop, Jean and Omar keep them near each other but separate. Plenty of space makes handling hives easier without the distraction of hens fluttering around. “We find that keeping bees and chickens boosts our vegetable and fruit yields. The chickens provide manure and the bees pollinate,” said Jean.

Before Jumping into Beekeeping
Beekeeping may seem like a perfect complement to a chicken flock, but before attempting it do homework to make sure it’s right for the family. Here are some things to consider.
Is it legal: Some communities allow backyard chickens but not bees. Weirdly other towns allow bees but not hens. Check local laws before investing in bees. Check local ordinances on town websites.
Will neighbors welcome bees: A neighbor deathly allergic to stings may not be crazy about bees buzzing into his yard. Talk with neighbors before jumping into bees. When we asked our neighbors if they’d be ok with us having hives, they were delighted. Many were gardeners who liked having pollinators living in a nearby hive.
Am I willing to learn: Beekeeping is an art that takes a while to master. Books, magazines, and YouTube videos can be educational but the best way to learn is to find an experienced beekeeper for a mentor.
Do I have the Time: Bee hives need attention during the warm months yet require much less time during winter. May and June are critical months for hive care. We had so many time commitments during those months that tending to our bees was a problem and eventually led us to give our hives and equipment away.
Am I willing to make the dollar investment: Yup, starting beekeeping can be expensive. Hives, swarms, smokers, veils, gloves, and coveralls are essential. Extractors are devices that spin honey out of waxy cells in the fall. They’re expensive, but often an established area beekeeper will let folks use his. It helps reduce cost. Used equipment can sometimes be located on Craig’s List or Facebook Marketplace. Most beekeepers order swarms of workers with one queen to get started. They’re shipped in the mail.
Am I strong enough to lift supers filled with heavy honey? A super is the uppermost part of the hive where bees store honey. It can weigh 50 pounds or more, so being able to lift heavy weights helps.
Don’t be discouraged. We absolutely loved our bees. They were so fascinating that a honey harvest seemed less important than what we learned from them, but we also remember cold autumn evenings when we enjoyed delicious cornbread, made with our eggs and covered with honey fresh from our hives.

Why is My Chick Sneezing? Common Causes and When to Worry
I think one of the most stressful parts of raising backyard chickens is the thought of one, or many, of them getting sick. As chicken keepers, we do everything we can to keep our birds healthy and happy. So when you hear a chick sneeze, it can definitely make your heart skip a beat.
The good news? Most chick sneezing is caused by something harmless, like dust or bedding irritation. But sometimes, sneezing can signal a bigger issue. Understanding the difference can help you respond quickly and keep your flock healthy.
Let’s walk through the most common reasons chicks sneeze, and what you can do about it.
The Most Common Cause of Chick Sneezing
Young chicks are very sensitive to their environment. Their tiny respiratory systems react quickly to dust, moisture and poor air quality.
Some of the most common irritants include:
-
Dust from bedding like wood shavings, hay or straw
-
Feed particles or crumbles getting into nasal passages
-
Ammonia buildup from droppings
-
Poor ventilation in the brooder
If the brooder isn’t cleaned often enough, ammonia from chick poop can build up quickly. That strong smell doesn’t just bother you, it can irritate your chicks’ lungs and lead to sneezing.
Keeping the brooder clean, dry, and well-ventilated is one of the best ways to protect their respiratory health.
I always. and I mean always, use Coop Recuperate in the brooder. It helps freshen and extend the life of bedding, which keeps the environment cleaner and easier on those little lungs. Honestly, it’s one of the reasons I’ve stayed in backyard chickens for this long.
Temperature Problems Can Trigger Sneezing in Chicks
Chicks can’t regulate their own body temperature until they’re older and fully feathered. If they get too cold, or too hot, their immune systems can weaken, making them more prone to irritation and illness.
Keeping the brooder temperature consistent is incredibly important during those first few weeks.
Your job? Keep them warm, dry and cozy.
(And if you need help setting up a brooder correctly, we’ve got a full guide that walks through it step by step.)
When Chick Sneezing Could Mean Illness
While sneezing is often harmless, it can sometimes be a sign of a respiratory infection caused by bacteria, viruses or fungi.
Watch closely for these symptoms:
-
Frequent or persistent sneezing
-
Nasal discharge (especially yellow or green)
-
Coughing or wheezing
-
Swelling around the eyes
-
Lethargy or reduced appetite
If you notice these signs, separate the chick immediately. Respiratory infections can spread quickly through a flock.
And if multiple chicks show symptoms, act fast. Early action makes a big difference!
How to Prevent Respiratory Issues in Baby Chicks
The best approach is prevention. A few simple management habits can dramatically reduce respiratory problems.
Here are the practices I rely on:
-
Use low-dust bedding like shredded paper or hemp
-
Maintain good airflow without drafts
-
Clean the brooder regularly
-
Keep bedding dry
-
Monitor temperature daily
I usually clean our brooder 1–2 times per week during the first couple of weeks. Plus, chicks are way more fun to interact with when their space is clean.
A Quick Note
If you’re adding adult birds to your flock, quarantine them for 30 days before mixing them in.
This step is incredibly important for preventing disease.
Personally, I don’t take in outside birds. It’s just not worth the risk for me. But I know many people who do, and quarantine is what keeps things safe.
What to Do if Your Chick Starts Sneezing
First, don’t panic. Most of the time, it’s something simple.
Start with these steps:
-
Observe your chick for additional symptoms
-
Check ventilation and bedding conditions
-
Confirm the brooder temperature is correct
-
Clean the brooder if needed
-
Monitor behavior and appetite
I use the Baby Chick Care Kit with every new batch of chicks, and it gives me peace of mind knowing I’m supporting their respiratory, digestive and immune systems right from the start.
When to Call a Vet
If sneezing continues or symptoms get worse, don’t hesitate to reach out to a poultry veterinarian. They can provide a proper diagnosis and treatment plan.
In my experience, staying consistent with good care and paying attention to your flock prevents most problems before they start.
And that peace of mind is worth everything.
Until next time,
– The Wing Lady

7 Classic American Chicken Breeds to Raise for America’s 250th Birthday
Top 3 Takeaways
- The Dominique is America’s oldest chicken breed, and it is older than America itself. It traces to roughly 1750, which means Dominiques were scratching around colonial farmyards a full generation before anyone signed the Declaration of Independence.
- Every breed on this list was either born on American soil or made its name here. Most are dual-purpose, cold-hardy, and calm enough for a first flock, which is a big part of why they have lasted.
- Keepers choose a bird for exactly what the Dominque offers. In a recent Hoover’s survey of 253 backyard Keepers, 85% percent said egg production is the single most important thing they want from a flock. When they pick a laying breed, 65% rank production reliability first and 56% rank cold and heat hardiness. Only 12% choose by name or reputation. That’s why we designed this series for both patriotism and production information!
A backyard tradition older than the nation
This summer, The United States of America celebrates its 250th birthday. There will be parades, fireworks, and bunting on every Main Street. Meanwhile, the oldest American tradition on your block will be out back rather than on the parade route. Backyard and private chicken keeping is a tradition older than the nation we celebrate this summer. Fortunately for those carrying on this storied tradition today, some of the very breeds that settled America are still here!
From now until the big America 250 celebration in July, we’ll be sharing a series to celebrate the heritage breeds that are as American as apple pie. Each week, we profile a breed that built the American backyard. We’ll delve into where it came from, what it’s like, how it produces and behaves, and if it’s right for your coop. By the end of the series, you’ll be able to stack the ultimate All-American Backyard Lineup!
The 7 founding breeds of the American backyard
Each of these was either developed on American soil or earned its reputation here. Each one has held its place for a reason, and each will get its own profile as the series rolls out.
- Dominique. America’s oldest breed, traced to roughly 1750. Calm, sociable, and bred to last. The fastest way to tell it from a Barred Rock is the rose comb. Lays about 245 medium brown eggs a year. It’s the subject of our first feature below.
- Rhode Island Red. Developed in the late 1800s in the country’s smallest state and now famous worldwide, laying around 265 eggs a year and parenting half the hybrids in the modern hen house. Two out of three keepers in our survey have raised one. No other breed on this list comes close.
- Barred Plymouth Rock. The black-and-white striped farm hen most people picture when they hear the word “chicken.” Tight feathering, a broad deep chest, and a steady, unbothered temperament. About 250 large brown eggs a year.
- Wyandotte. An American original, known for laced feathers that look almost frosted and a cold-friendly rose comb. A handsome dual-purpose bird that shrugs off winter.
- Jersey Giant. Born in New Jersey and still one of the largest breeds you can keep. Slow to mature, at about six months, but gentle, friendly, and a steady source of large brown eggs.
- New Hampshire. Refined in New England from Rhode Island Red stock for faster growth and dependable laying. A quiet, no-drama dual-purpose bird.
- Delaware. Developed in 1940 in the state it is named for. White with black-laced hackles, quick to mature, calm, and good for about 260 large brown eggs a year.
With the lineup set, let’s begin!
Breed of the Week: The Dominique
If you want to hold a piece of pre-Revolutionary America in your hands, hold a Dominique.
The Dominique is widely recognized as the oldest chicken breed in America, developed as early as 1750 and brought to the Northeast by European settlers. Put plainly, there were Dominiques on American farms before there was an America. They fed colonial families. They went west in the wagons. They did the quiet, daily work of keeping a household running, and they have not stopped since.
What makes the Dominique great
Temperament. Dominique hens are steady, curious, and easy to handle. The same calm demeanor that makes them good show birds makes them good family birds.
Eggs. Expect about 245 medium brown eggs a year. That is a dependable basket from a bird this longstanding and this hardy, and it keeps coming long after the high-output hybrids have tapered off.
Build. At a mature 5 to 6 pounds, the Dominique is a practical, easy-to-manage size for a backyard flock. It also carries the constitution of a breed that has weathered more than two and a half centuries of American winters, predators, and lean years. Hardiness is not a mere claim here. It is the reason the bird still exists.
Why heritage matters right now. Here is something our survey keepers told us in their own words: high-output hybrids tend to burn bright and fade, with laying often dropping off at two or three years. Heritage breeds like the Dominique pace themselves. If you want a hen that is still part of the family for years to come, this is the breed.
Dominique or Barred Rock? Here is how to tell them apart
Side by side, a Dominique and a Barred Plymouth Rock look almost identical. Both wear the same handsome black-and-white barring. The giveaway is the comb. A Dominique has a rose comb: low, flat, and finished with a small spike at the back. A Barred Rock has a single comb: the tall, upright, saw-toothed kind. Once you know to check the comb, you will never confuse the two again.

Barred Plymouth Rock Dominique
That rose comb is not just an ID tag, either. It gives the Dominique a real edge in cold country. Less comb means less surface area exposed to frost, so there is less to get nipped on a hard winter night. The oldest breed in America also happens to be one of the better-built for an American winter. That is not a coincidence. It is 275 years of selection.
Who the Dominique is for
If this is your first flock, the Dominique is hard to beat. It is friendly, low-drama, forgiving of beginners, and it comes with a story that’s perfect for telling at the neighborhood barbecue.
If you have kept chickens for years, this is a breed that rewards patience. You are not chasing a peak-output number. You are choosing longevity, heritage genetics, and a hen that earns its keep season after season.
And if you simply want the most genuinely American chicken there is, there is no debate. The Dominique was here first. Everything else on this list came after.
FAQ
What is the oldest American chicken breed?
The Dominique is widely recognized as America’s oldest chicken breed, with origins traced to roughly 1750. It predates the founding of the United States and is considered a heritage breed.
Which chicken breeds were developed in the United States?
American-developed breeds include the Dominique, Rhode Island Red, Plymouth Rock, Wyandotte, Jersey Giant, New Hampshire, and Delaware. Most are dual-purpose birds valued for steady egg production and hardiness.
Which American chicken breed is best for beginners?
The Dominique and the Rhode Island Red are two of the best starter breeds. Both are calm, reliable layers that adapt easily to a backyard setting, which is why they stay popular with first-time keepers.
What is the most popular American brown egg layer?
The Rhode Island Red. In a recent Hoover’s survey of 253 backyard keepers, 66% had raised one, making it the most common brown egg layer in American backyards.
How do you tell a Dominique from a Barred Plymouth Rock?
Check the comb. A Dominique has a rose comb, which sits low and flat, while a Barred Plymouth Rock has a tall single comb. Their barred feather patterns look nearly identical, so the comb is the reliable way to tell them apart.
Raise a piece of American history
At Hoover’s Hatchery, we believe starting or keeping a backyard flock is a great way to celebrate America 250. Having something real in your own backyard – something that gets you closer to independence – is a great way to exercise the same spirit of our nation’s founding. And it fits in your yard!
Coming up next…
Next week we head to the nation’s smallest state for the breed that changed chicken keeping around the world: the Rhode Island Red. Until then, the oldest chicken in America is waiting for you. Learn more or add them to your yard now at www.hoovershatchery.com
FlockJourney is brought to you by Hoover’s Hatchery, the nationwide leader in backyard poultry. For more than 80 years, Hoover’s has lived its values of Excellence, Tenacity, Servitude, Humility, and Ingenuity while 100% focused on backyard poultry. From chickens, ducks, and pheasants, to turkeys, geese, guineas, quail, bantams, and rare breeds, Hoover’s has the best variety and the highest quality genetics in the industry. Find Hoover’s chicks at your local farm store or shop online at www.hoovershatchery.com.
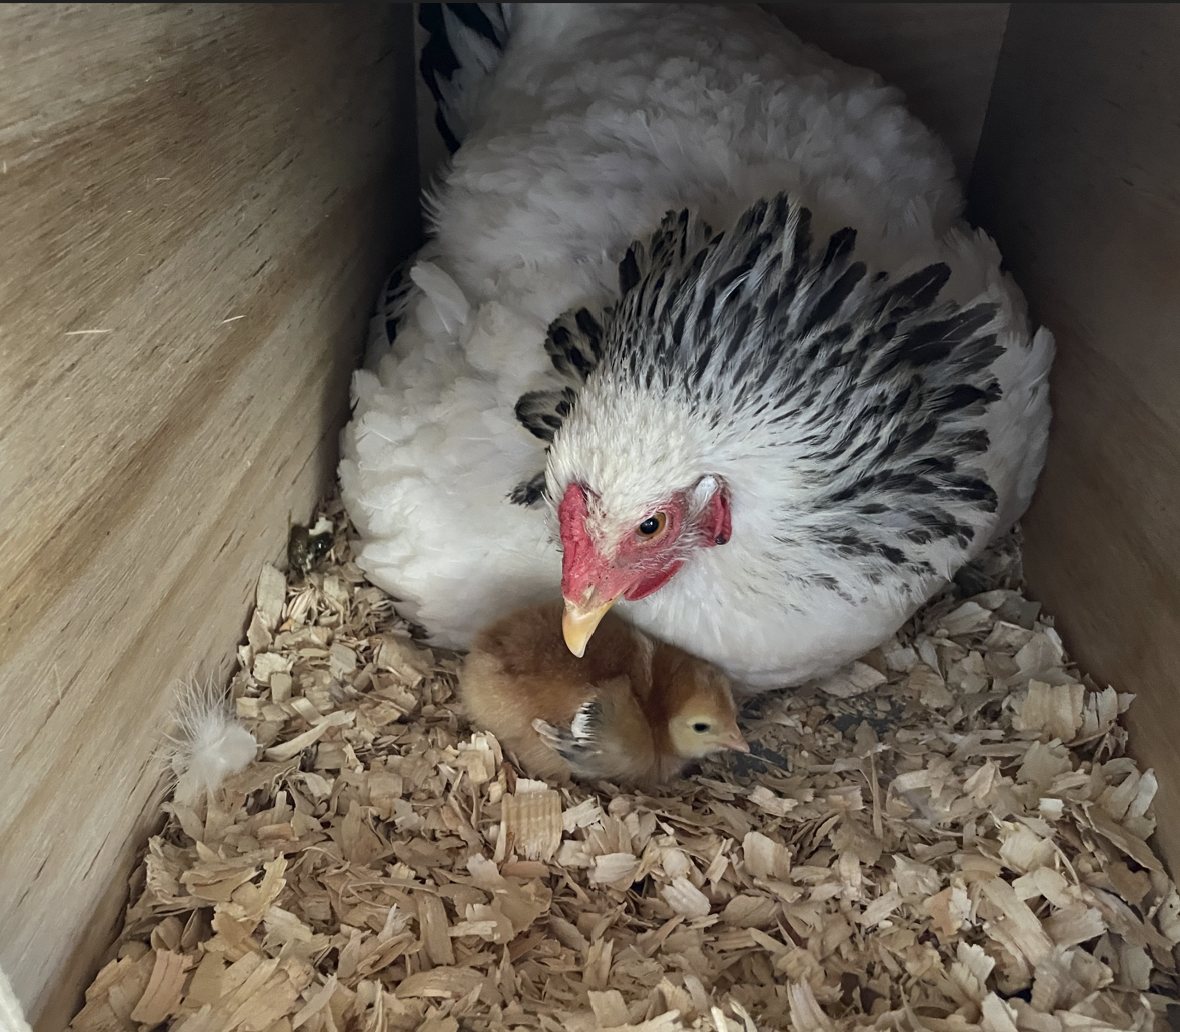
Managing a Broody Hen
Managing a Broody Hen
One of the most fascinating experiences of raising a backyard flock of hens can also be the most frustrating.
Every once in a while, a hen acts strangely. She fluffs her feathers, changes her clucking pitch, stops laying, and spends almost all her time in the nest. Reach in to retrieve eggs from under her and she’ll enthusiastically scold and probably give fingers a good peck.
She’s broody!
Broodiness is a natural bird instinct. Until artificial incubators came along in the late 1800s all baby chicks were brooded by a live hen. Farmers would prepare rows of nests filled with broody hens to ensure plenty of chicks for future chicken dinners and plentiful eggs. Over the years breeders have reduced broodiness in many chicken breeds and hybrids. Today nearly all chicks are hatched in modern incubators.
What Breeds Go Broody
The Hoover’s Hatchery catalog lists breeds that are likely or unlikely to become broody but the important word is “likely”. These are living creatures. There are always exceptions but generally the catalog’s advice is sound. It helps a customer predict the likelihood of broodiness in any breed or hybrid.
Some breeds like, Orpingtons, Cochins, Brahmas and other traditional heavy breed hens often go broody, but sometimes even white egg commercial strain hens choose motherhood. California Whites supposedly rarely go broody, but we’ve had a few be persistently broody and successfully raise babies.
Although broodiness is most common in the spring, sometimes hens opt for motherhood during the wrong season. We’ve had hens go broody in mid winter’s subzero cold. There’s no way babies can survive intense cold. Spring is the best season to let a broody hen contentedly enter motherhood.
The Downside of Broodiness and How to Discourage It
Here are some reasons why a flock owner might want to discourage a broody hen:
- Hens don’t lay when they are incubating eggs or raising babies. If lots of eggs are needed broody hens are a frustrating problem.
- Hens will go broody even if there’s no rooster in the coop. She will sit contentedly on infertile eggs for weeks and they’ll never hatch.
- It’s the wrong season for baby chicks.
When one of our hens goes broody and we need kitchen eggs but not baby chicks we put her in isolation. We have a large coop separated by a wire mesh wall. When a hen goes broody, we put her in one side that has no nests or cavities where she might sit. Usually after three or four days the broody tendency fades and we let her back into the flock. Soon she’ll be laying again. Anyone lacking a second coop could put a broody in a large cage with plenty of food and water but no nest.
The Upside of Broodiness
One of the most fascinating aspects of keeping chickens is watching a hen as she patiently incubates eggs and raises babies. It’s downright fun and is an inexpensive way to get new chicks for the flock. We have a rooster so our hen’s eggs are fertile and will hatch. In past years when we didn’t have a rooster we’d buy or swap eggs with a friend who has a rooster and put them under her. Fertile eggs can be ordered through the Internet.
When one of our hens goes broody and we want chicks we do these things:
- Put her in her own nest separated from other hens.
- Mark all the eggs we hope will hatch with pencilled “X” on their shells.
- Have chick starter feed, feeders and waterers ready for when the chicks hatch.
If all goes well after 21 days those eggs hatch and one proud new mother will introduce them to the world. She does the work keeping the babies warm and showing them food and water. We keep mom and chicks separate from the main flock until the babies are nearly full size.
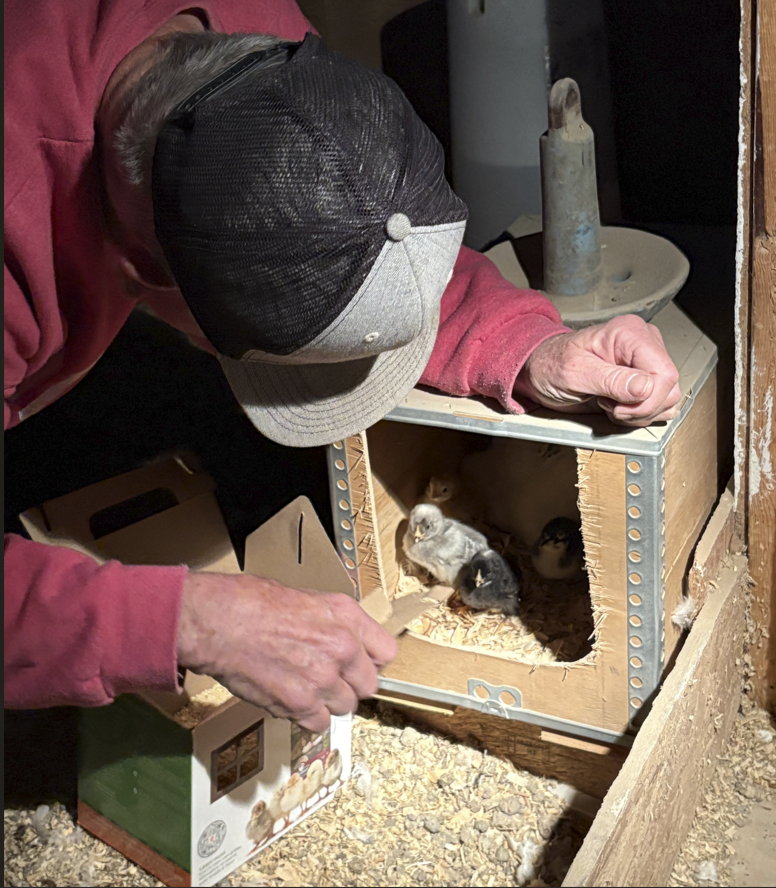
No fertile eggs? Here’s a trick to enable a broody hen to raise babies.
- Separate her from the other hens and put a comfy nest in her new quarters.
- Put six or eight golf balls or artificial nest eggs in the nest. She’ll settle right down on them and keep them warm.
- After she’s been sitting for at least two weeks, buy six to ten chicks from a nearby farm store.
- Using a flashlight enter the coop after dark and remove the golf balls or nest eggs from under the hen. Replace them with the peeping babies.
Almost always Mom will readily adopt the new babies and proudly raise them.
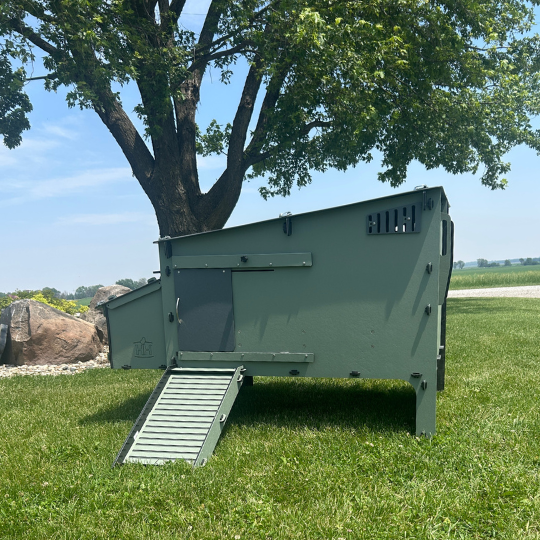
12 Months in a North Iowa Backyard. One Polar Vortex. Here’s How the Hoover’s Coop Held Up.
12 Months in a North Iowa Backyard. One Polar Vortex. Here’s How the Hoover’s Coop Held Up.
On a rural property outside Mason City, Iowa, sits a 10-Bird Hoover’s Lean-To Easy Clean Coop and Run. It’s been there for nearly a full year, holding a small flock of backyard chickens through some unpredictable weather conditions. Now, 12 months later, the coop is holding up just as well as we expected. While the inside has been cleaned on a regular schedule (the coop has been home to two Rhode Island Reds and two Light Brahmas this year), the outside underwent no regular maintenance.
Looking at it, you would never know that it wasn’t brand new. And that’s something we think every backyard chicken keeper should know.
What North Iowa Actually Threw at It
When the coop was installed, we knew we were putting it through a real test. This is rural Iowa. Winds are strong and sustained. The sun shines hot and intensely all summer, while the ice and snow pelt it all winter. In the 12 months since the coop went into this backyard, it’s held up against weather that included heavy humidity and temperatures into the 90s, a long autumn, and a winter that started slow and then turned brutal in the second half of January.
That was when the polar vortex split. The 2026 North American cold wave dropped Arctic air across the central United States in January and February, bringing temperatures 20 to 35 degrees below average across the Midwest. In North Iowa, that meant nights well below zero, dangerous wind chills, and the kind of cold that puts wooden coops at real risk of cracking and warping. It was all followed by a fragile Iowa spring featuring multiple freeze-thaw cycles, wind-driven rain, and snowmelt followed by fresh snow.
What the Coop Looks Like Now
In short, the coop looks nearly identical to the day it was installed.
The heavy-duty recycled plastic panels show no fading, no cracking, no warping. The hinges and locking pins move the way they did when the coop was new. The roof is flat and free of damage. The door slides cleanly. The run still stands square against the side.
The inside of this coop has been cleaned regularly, meaning the bedding has been raked out and the nesting boxes refreshed often. Meanwhile, the outside has not been treated the way a wooden coop often needs to be: through sanding, staining, or sealing.
After 12 months facing whatever the weather wanted to do to it, the coop looks roughly the same now as the day it shipped.
Why This Matters
If you have kept backyard chickens, you’re probably familiar with the wooden coop story. The first season is great. Wear begins to appear in season two. Maybe that means rust on a hinge or a softening corner. By the third or fourth winter, you’re most likely repainting and resealing or just shopping for a replacement.
That is the cycle Hoover’s spent 82 years watching our customers go through. We are bringing this coop to market to break that cycle. No rot, no warp, no annual maintenance – and no blowing over when the winter wind gives it its all! The North Iowa coop is proof that we’re accomplishing what we set out to do.
What We Learned This Year
This coop holds its own in the wind. Today its just as sturdy and tightly constructed as the day we assembled it.
Polar vortex temperatures hit the inside differently than the outside. What the deep cold did to the structure of the coop: nothing visible. Meanwhile, on the inside, the flock came through happy and healthy because the coop is designed to ventilate without leaking heat.
The inside held up to the routine maintenance. After 12 months of raking out bedding and replacing it, the inside shows only the signs of that maintenance rather than an interior that’s been chewed up by 12 months of use.
What’s Next
Stick with Hoover’s Hatchery and FlockJourney to see how our Lean-To Easy Clean Coop holds up in real-world conditions. We’ll bring real photos and videos to show what the real world effects are on this coop that we’re so proud of.
Want to see the coop in person? Visit select Tractor Supply, Murdoch’s, or Country Store locations. To be connected to the nearest location carrying the coop, contact us at www.hoovershatchery.com/coops. To purchase one now, visit these links:
- Flockjourney is brought to you by Hoover’s Hatchery, the nationwide leader in backyard poultry. For more than 80 years, Hoover’s has lived its values of Excellence, Tenacity, Servitude, Humility, and Ingenuity while 100% focused on backyard poultry. From chickens, ducks, and pheasants, to turkeys, geese, guineas, quail, bantams, and rare breeds, Hoover’s has the best variety and the highest quality genetics in the industry. Find Hoover’s chicks at your local farm store or shop online at hoovershatchery.com.
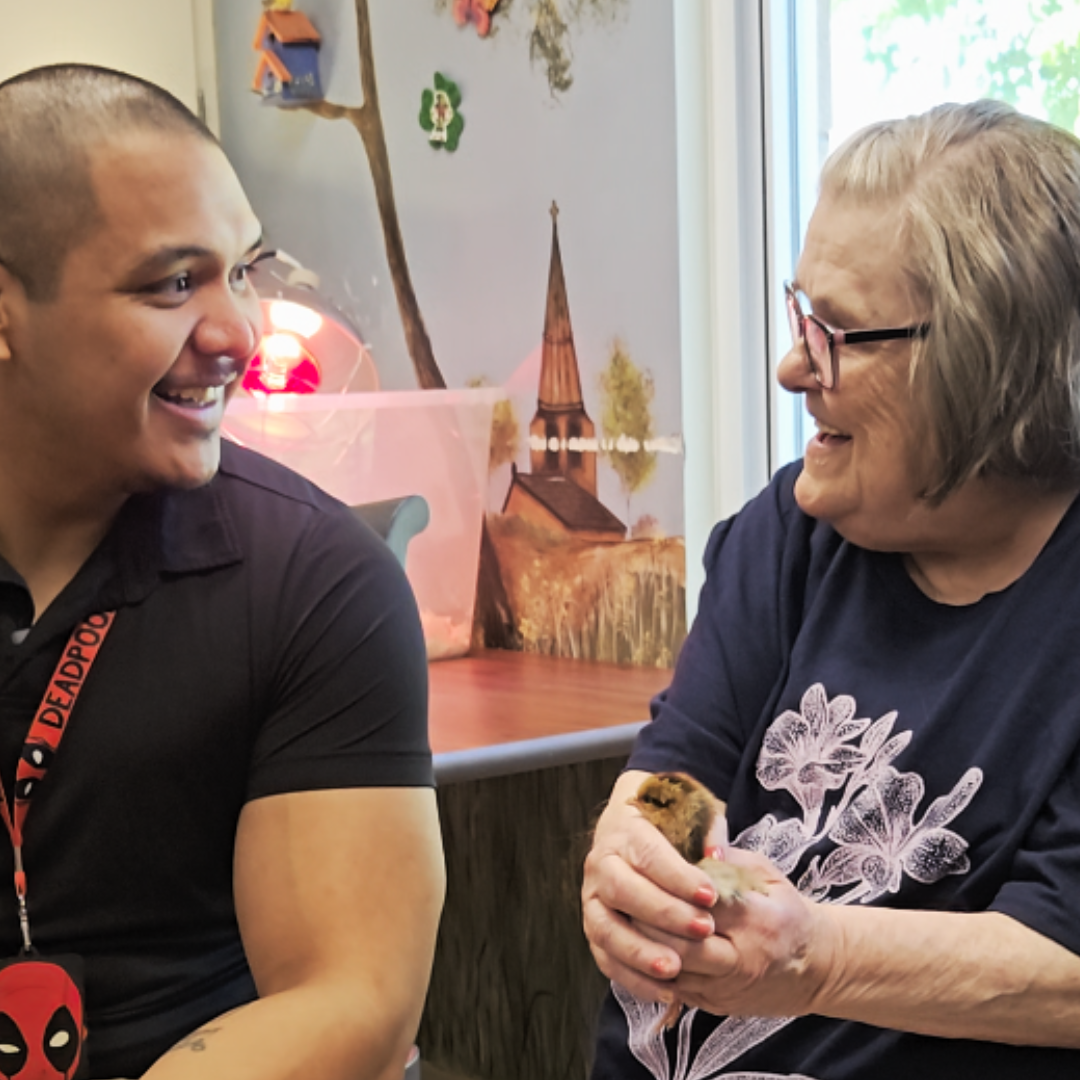
Why We Delivered Four Chicks to an Iowa Care Home
Why We Delivered Four Chicks to an Iowa Care Home
This morning, four chicks arrived at the IOOF Home and Community Therapy Center in Mason City. They came with a brooder, a feeder, a waterer, a heat lamp, and a bag of feed.
This isn’t a typical Hoover’s delivery. We’ve been an Iowa hatchery since 1944. Most days, we ship chicks to backyards across all the country. Today, four of them stayed close to home.
The chicks will live at IOOF Home & Community Therapy Center for the next six to eight weeks while they grow their feathers and gain size. Residents will be able to be near them. Staff will care for them. Family members visiting their loved ones will stop by the brooder before they leave. That last part is one of the reasons we are doing this.
“Having that emotional support from an animal does provide some comfort for the residents. Some residents don’t even have family.”
ANTHONY ROMUALDO, IOOF HOME
Chickens are doing this work in care facilities all over the world right now. A program called HenPower has placed chickens in more than 40 UK care homes since 2011. Northumbria University studied the residents and found measurable reductions in loneliness and depression, and participating care homes reduced their use of antipsychotic medication. In 2013, the Life Care Center of Nashoba Valley in Massachusetts introduced chickens as a calming tool for residents with dementia. Programs like this have since spread across the United States.
What chickens can really do for an elderly community
The clinical research speaks for itself. Chickens trigger long-term memories in residents who grew up around farms. They give people a daily reason to engage: feeding, watching, collecting eggs. They calm dementia patients in ways other animals do not. They can be observed from a window, fed from a wheelchair, or held in the lap. Mobility is not a barrier.
What we noticed when we talked to Anthony, though, is that the chickens may quietly do something else. They bring families back in.
“It’s a big draw for our facility and our residents, families, and staff to bring little ones. Anytime we have events like our Easter egg hunt or Halloween, we have kids running around here everywhere and the residents just love it.”
A flock of chickens is exactly that kind of draw. Kids love being around chicks. A grandchild who might not have a strong reason to visit Grandma every weekend now has a reason to come back and check on the new chicks growing up at her care home. They feed them. They hold them. They watch them grow. And the residents get more time with their families because of it.
The four chicks living at IOOF Home
We hand-selected four breeds for IOOF Home, each chosen for personality, visual interest, and what they will look like as adults. Different colors, different patterns, different conversation starters.
Sapphire Gem®. A beautiful slate-blue hybrid layer with a sweet, gentle disposition. A reliable producer of large brown eggs. Easy to handle and friendly.
New Hampshire Red. A heritage American breed dating to 1935. Calm, hardy, and prolific. The kind of chicken your grandparents probably kept.
Production Blue. A blue-feathered hybrid from our Privett line, known for productivity and a friendly nature. A strong layer of large brown eggs.
Blue Breasted Brown Leghorn. Active, alert, and visually striking. An excellent layer of white eggs with a curious, engaging personality.
What happens next
Today’s delivery is Phase One. The chicks will live in a brooder for the next six to eight weeks while they grow their feathers and gain size. The staff will care for them daily, watch them develop, and start to know them as individuals.
When the chicks are ready to move outside, we’ll be back. Phase Two is the installation of a Hoover’s Lean-To Easy Clean Chicken Coop, designed to make the daily routine of caring for adult birds easier for everyone involved. The local media is invited back to cover that, too.
Hoover’s Hatchery is the largest provider of backyard poultry in the United States, offering more than 200 breeds shipped from four hatcheries across Iowa, Pennsylvania, New Mexico, and Missouri. Learn more about getting started with backyard chickens at hoovershatchery.com.